

 |
 |
 |
 |
 |
 |
 |
 |
wa na na na na na na na bat shawl! > alia > parlor round >
fuck off, i'm trying to read > run away! > algormortis >
baba yaga > bonjour, nazar boncugu > impaler
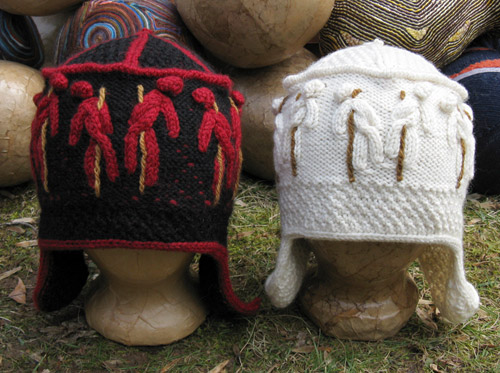
Dale Hwang (photo)
click to enlarge

Vlad the Impaler didn't crotchet his own ear-flapped bobble hats. And neither should you.
—Steven Wells
Curly ear flaps, integrated I-cord edging, a removable double tassel, and, oh yeah, impaled people running around the crown. A Vlad the Impaler hat with little people worked up in cables and bobbles.
Suggested Watching
Vlad Tepes (1979, unrated)
Difficulty
Strong Intermediate
Click here for definitions of difficulty levels.
Finished Measurements
Pattern is sized for a Medium which fits 21.5"/54.6cm-23.5"/59.7cm. Adjusting size is primarily done through gauge, so adjust yarn weight as well as needle size. See Design Notes for more on resizing.
Download
Single-Color Chart (pdf format)
Two-Color Chart (pdf format)
Materials
Single-Color Version:
- Single-Color Version only: Cascade 220 [100% wool; 220yds/201m per 3.5 oz/100g hank] #8010 natural; 1 hank
Two-Color Version:
- Peruvian Highland Wool [100% Highland wool; 109yds/100m per 1.75oz/50g ball]#500 black, 2 balls (MC)
- Peruvian Highland Wool [100% Highland wool; 109yds/100m per 1.75oz/50g ball] #2055 ruby , 1 ball (CC)
BOTH VERSIONS:
- 6 yards of worsted weight brown yarn
- US 6/4mm 16" circular knitting needle (optional)
- US 6/4mm set of 4 or 5 DPNs
- Cable needle
- G/4mm crochet hook
- Stitch markers
- Tapestry needle
- Waste yarn
Gauge
Single-Color Version
20 sts per 4"/10cm in stockinette.
Two-Color Version
19 sts per 4"/10cm in stockinette to accommodate the extra thickness of the floats.
Design Notes
For a Small, adjust gauge to 5.5 stitches per inch (2.54cm) and work the crown to 5.5"/14cm before beginning applied I-cord edging. For a Large, adjust gauge to 4.5 stitches per inch (2.54cm) and work to 6.5"/16.5cm before beginning applied I-cord edging.
Note: The ear flaps curl because the I-cord is the same length as the total number of rows in the ear flaps, rather than the length of the edge of the ear flaps which is longer. Therefore, for ear flaps that do not curl, work the I-cord twice for every decrease.
Special Stitches
k3tog (knit 3 together): Knit into three stitches as if they were one.
p3tog (purl 3 together): Purl into three stitches as if they were one.
pkk (purl double inc.): P1 tbl, then knit into the front of the same stitch. Then lift the vertical bar formed between these two stitches, it is the right leg of the stitch which has been worked. Knit into it through the back. The stitch which has been worked into will be twisted, and the 3 new stitches will be a purl, a knit, and a knit.
kkp (knit double inc): K1 tbl, then knit into the front of the same stitch. Then lift the vertical bar formed between these two stitches, it is the right leg of the stitch which has been worked. Knit into it through the back. The stitch which has been worked into will be twisted, and the 3 new stitches will be a knit, a knit, and a purl.
dec5 (decrease 5 to 1): This interleaves the 2 stitches on either side of the middle stitch over the middle stitch.: Slip 3 stitches. Pass the 2nd slipped stitch over the 3rd (middle) stitch. Place the middle stitch back onto the left hand needle and pass the next stitch over it. Slip the middle stitch again and pass the 1st of the slipped stitches over it. Place the middle stitch back onto the left hand needle and pass the next stitch over it. Purl the middle stitch.
m1p (make 1 purlwise): Lift the strand or bar of yarn between the last and next stitches and purl it tbl.
B (make bobble) Single-Color Version:
(K1, yo) 3 times and then k1, all into the same stitch for 7st total. Turn and k7. Turn and p7. Turn and k3tog, k1, k3tog. Turn and p3tog. Push the bobble stitches to the front of the work if necessary.
Using CC (k1, yo) 3 times and then k1, all into the same stitch for 7st total. Turn and k7. Turn and p7. Turn and k3tog, k1, k3tog. Turn, change to MC and k3tog. Push the bobble stitches to the front of the work if necessary.
Cable crosses:
2/4 left cross: sl 2 and hold in front, k4, k2 off the cable needle.
2/4 right cross: sl 4 and hold in back, k2, k4 off the cable needle.
6/1 left cross: sl 6 and hold in front, p1, k6 off the cable needle.
6/1 right cross: sl 1 and hold in back, k6, p1 off the cable needle.
2/1 left cross: sl 2 and hold in front, p1, k2 off the cable needle.
2/1 right cross: sl 1 and hold in back, k2, p1 off the cable needle.
4/p2tog left: sl 4 and hold in front, p2tog, k4 off the cable needle.
4/p2tog right: sl 2 and hold in back, k4, p2tog off the cable needle.
4/k2tog left: sl 4 and hold in front, k2tog, k4 off the cable needle.
4/k2tog right: sl 2 and hold in back, k4, k2tog off the cable needle.
Double Seed Stitch: A stitch of many names; it's also called moss stitch and double moss stitch. Multiple of 2 stitches over 4 rows.
Rows 1 and 2: (k1, p1) repeat to end.
Rows 3 and 4: (p1, k1) repeat to end.
Applied I-cord: Worked over 4 stitches. K3, ssk the last stitch of the I-cord together with 1 stitch from the edge of the hat. Slip 1 from the edge of the hat. Push these 5 stitches to the other end of the needle and (k3, ssk) again. Slip 1 from the edge of the hat. Continue in this way until all the necessary stitches have been worked.
Cable Band:
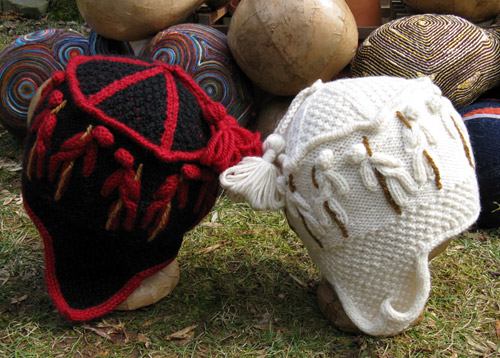
Dale Hwang (photo)
click image to enlarge
Single-Color Version
Provisional cast on 108 sts on the circular needle.
Join in round, place marker.
Rnd 1: (p7, p2tog) 12 times. (96 sts)
Rnds 2-25: work Tepes cable chart 6 times across. To keep track of the bodies, it helps to place markers every 8 (half a repeat) or 16 sts (a full repeat).
Rnd 26: *p1, m1p, p14, m1p, p1* 6 times. (108 sts)
Two-Color Version
Be sure to maintain color dominance of the CC when working stranded colorwork. Always bring the CC up from below the MC and cross the MC over the CC when stranding.
Provisional cast on 108 sts in MC on the circular needle.
Join in round, place marker.
Rnd 1: *p7, p2tog* 12 times. (96 sts)
Rnds 2-25: work alternate cable chart and the indicated stitches in CC. Where there is a color bar across a purl stitch, bring the CC to the front, purl the stitch with MC and then bring the CC to the back again. This runs a small bar of CC to the right side of the work, which will show up as a fleck. Be sure to leave the floats loose enough to stretch or the hat may not fit properly. The first two rows where the CC is not knit can be worked very loosely. Any excess can then be pulled from the beginning tail.
When working the double increases which form the base of the legs and arms, work the purl stitch in MC and the knit stitches in CC. Break CC after round 21 is complete. Join CC individually for each bobble when working row 23.
Rnd 26: MC *p1, m1p, p14, m1p, p1* 6 times. (108 sts)
Crown Piping:
Single-Color Version
Knit 5 rows.
On the next round with the left needle tip, lift the purl bump from the back of the stitch 5 rows down from the stitch on the needle. It will be the first purl bump available in that column. Knit it together with the stitch on the needle. Continue this way all the way around.
Two-Color Version
Change color to CC and knit 5 rows.
On the next round with the left needle tip, lift the purl bump from the back of the stitch 5 rows down from the stitch on the needle. It will be the first purl bump available in that column and it will be in MC. Knit it together with the stitch on the needle. Work this way in the following color order: (CC 2 sts, MC 14 sts, CC 2 sts) 6 times. Weave the long CC floats behind the black in the center of the row. This results in CC piping and prepares the next row for the crown decreases.
Crown Decreases:
There are 12 decreases worked every third round, creating six triangular sections. For the following rounds work in double seed stitch except for the first and last stitch of every section. These will be knit (or decreased knitwise) regardless of the neighboring stitches.
Single-Color Version
Rnd 1 (dec): **ssk, *k1, p1* 7 times, k2tog**. Repeat from ** to ** 5 more times.
Rnd 2: Work as est.
Rnd 3: **k1, *p1, k1* 7 times, k1**. Repeat from ** to ** 5 more times.
Rnd 4 (dec): **ssk, *k1, p1* 6 times, k2tog**. Repeat from ** to ** 5 more times.
Continue decreasing this way, changing to double pointed needles when necessary, until 12 sts remain. Knit 1 round, break yarn leaving a longer tail and draw the tail through the remaining stitches.
Crochet ch 6 with the tail and draw the end through the last loop of the chain. Tack the end of the chain down creating a small loop for the tassel. Weave in the end.
Two-Color Version
For the decrease rounds, work in MC in double seed stitch except for the first and last stitch of every section. These will be knit (or decreased knitwise) in CC. Twist or weave the CC behind the MC on a knit stitch as necessary.
Rnd 1 (dec): **CC ssk, MC *k1, p1* 7 times, CC k2tog**. Repeat from ** to ** 5 more times.
Rnd 2: Work as est.
Rnd 3: **CC k1, MC *p1, k1* 7 times, CC k1**. Repeat from ** to ** 5 more times..
Rnd 4 (dec): **CC ssk, MC *k1, p1* 6 times, CC k2tog**. Repeat from ** to ** 5 more times.
Continue decreasing this way, changing to double pointed needles when necessary, until 12 sts remain. Knit 1 round, break yarn leaving a longer tail and draw the tail through the remaining stitches.
Crochet ch 6 with the tail and draw the end through the last loop of the chain. Tack the end of the chain down creating a small loop for the tassel. Weave in the end.
Complete the Crown:
BOTH VERSIONS
Using the MC, pick up the 108 stitches from the provisional cast-on. Work in double seed stitch until the hat is 6 inches deep from the bottom of the piping. Slip 12 and break yarn.
Crown Edging:
BOTH VERSIONS
The front of the hat has 48 stitches, each ear flap has 16, and the back of the hat has 28. Slipping 12 stitches before beginning the edging centers a point of the crown at the front of the hat.
Provisional CO 4sts on a double pointed needle (in CC if working the two color version).
Work applied I-cord around the hat for 48 sts. Then, leaving the 4 sts of I-cord on the needle, join a ball of MC and work in double seed stitch as established across 16 sts. Drop the yarn. With a separate double pointed needle and another ball of yarn (CC if working the two color version), provisionally cast on 4 sts and work applied I-cord around the hat for 28 sts. Again, leave the 4 sts of I-cord on the needle, join a ball of MC and continue working in double seed as established across the remaining 16 sts.
This results in 2 sets of 20 sts on two separate double pointed needles, one for each ear flap.
Ear Flaps:
Single-Color Version
Work each ear flap as follows.
On a set of 20 sts, pick up and knit the 4 provisional stitches available from the end of applied I-cord adjacent. 24 sts total; this is Row 1 (RS).
Turn.
Row 2 (WS): Hold the yarn in front, slip the first 4 sts (the ones just worked from the provisional cast on I-cord). Work in double seed stitch as established over the next 16 sts and then slip the last 4 sts with yarn in front again.
Row 3 (RS): Turn, knit the first 4 sts, work 16 sts double seed, and knit the last 4 sts.
This continues the I-cord edging down the sides of the ear flap.
Repeat Rows 2 and 3 until the ear flap measures 2.5"/6.4cm long from its first row. End with a WS row.
Next Row (RS): Begin decreases. Work in the established pattern of I-cord and double seed, decreasing 1 st into the I-cord on either side of the central double seed section. The first decrease row will be: k3, ssk, 14 sts in double seed, k2tog, k3.
Decrease as established to 8 sts.
Work as 8 st I-cord for two rows.
Next row: *Ssk, k2tog* 2 times
Next row: K2tog, ssk.†
Break yarn and pull the tail through the last two stitches.
†Ear flap detail (optional): The ear flaps curl because the I-cord is the same length as the total number of rows in the ear flaps, rather than the length of the edge of the ear flaps. Using the tail of yarn, tack the point of the flap to the body of the flap, centered 1.5"/3.8cm from the top of the ear flap. If working this detail work the last decrease row as (ssk, k2tog).
For ear flaps which do not curl up: on ear flap decrease rows, work the I-cord twice at the beginning of a decrease row, working the decrease into the second round of I-cord only. Do this until 8 sts remain and then continue as written.
Two-Color Version
Be sure to interlock the CC and MC on both the right and the wrong side of the fabric, especially when the CC is not worked on the wrong side row.
On a set of 20 sts, pick up the 4 provisional stitches available from the end of the applied I-cord adjacent. Join a new ball of CC and knit those 4 sts. 24 sts total; this is Row 1 (RS).
Turn.
Row 2 (WS): Hold the yarn in front, slip the first 4 sts (CC). Catch the end of the CC strand with the MC working yarn and work in MC in double seed stitch as established over the next 16 sts. Slip the last 4 sts with yarn in front again.
Row 3 (RS): Turn, knit the first 4 sts in CC, catch the end of the CC strand with the MC working yarn and in MC in double seed stitch as established over the next 16 sts. Catch the end of the MC strand with the CC working yarn and knit in CC the last 4 sts.
This continues the CC I-cord edging down the sides of the ear flap. Repeat Rows 2 and 3 until the ear flap measures 2.5"/6.4cm long from its first row. End with a WS row.
Next Row (RS): Begin decreases. Work in the established pattern of CC I-cord and MC double seed, decreasing 1 st into the I-cord on either side of the central double seed section. The first decrease row will be: CC k3, ssk, MC 14 sts in double seed, CC k2tog, k3.
Decrease as established to 8 sts (all stitches will be CC)
Work as 8 st I-cord for two rows.
Next Row: (ssk, k2tog) 2 times
Next Row: k2tog, ssk†
Break yarn and pull the tail through the last two stitches.
†Ear flap detail (optional): The ear flaps curl because the I-cord is the same length as the total number of rows in the ear flaps, rather than the length of the edge of the ear flaps. Using the tail of yarn, tack the point of the flap to the body of the flap, centered 1.5"/3.8cm from the top of the ear flap. If working this detail work the last decrease row as (ssk, k2tog).
For ear flaps which do not curl up: on ear flap decrease rows, work the I-cord twice at the beginning of a decrease row, working the decrease into the second round of I-cord only. Do this until 8 sts remain and then continue as written.
Finishing:
BOTH VERSIONS
Weave in all the ends, and block. If the ear flaps have been tacked up, smooth them each into a soft, open pouch-like shape.
The spikes:
Once the hat is blocked, embroider a spike through each body using stem stitch, back stitch, or any other preferred embroidery stitch. Be careful to work loosely enough so the stitches can stretch to accommodate when the hat is worn. Alternately, an applied crochet chain can be worked, or if using yarn which can felt, the spikes may be needle felted to the hat.
Tassels (optional):
Make two 3-inch tassels (use CC if making the two color version). Wrap 25 times around an Altoids tin or a 6"/15.3cm piece of cardboard and cut a long tail. Tie a knot at one end of the tassel with this tail and then wrap tightly around "neck" of the tassel approximately .75"/1.9cm down from the knot. Using the tapestry needle, weave the tail through the "neck" of the tassel several times to secure. Join the tassels with a 6"/15.3cm long crochet chain. Draw part of the crochet chain through the small loop at the top of the hat, and then pull the two tassels through (a lark's foot knot or girth hitch).
About
contact Dale:
• legal info
![]()
home • antifesto • this issue • archive • submit • errata • masthead • contact us • legal