

 |
 |
Mini-Issue #5 |
 |
 |
 |
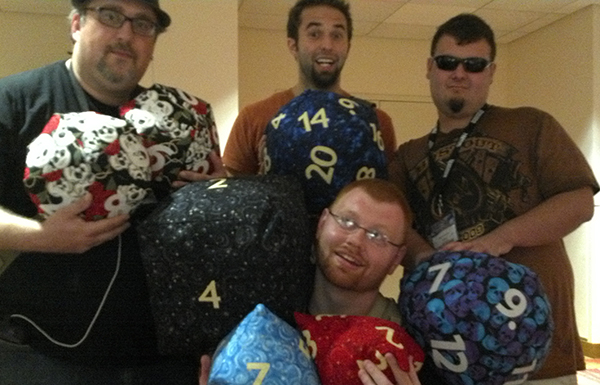
I have no idea who those guys above are, but they walked past our pile of dice at GenCon and went into completely nonverbal squee mode. Good times! Sidenote: the guy holding the d20 is into Velma like whoa. I gave him one of the Velma stickers and I thought he was gonna die. (If you don't know who Velma is, awwwww, aren't you a cute little thing? Now use your wittle fingwers to do a google search.)
This all started, as so many projects do, with The Internets. Oh, Internets, is there no trouble into which you can't get me? You see, I was watching Bonnie Burton's new breakneck crafting web show, Geek DIY, when up popped Wil Wheaton as a guest crafter. At 4 minutes and 30 seconds in, he begged politely requested for the Internets to provide him with some polyhedral dice pillows because he's afraid of stabbing himself with a needle. I hit pause and immediately sent out an email to the girls I like to call The Indiana Craft Bitch Collective, Joan of Dark and Laura Hohman, since Wil was going to be a guest at this year's GenCon and so was Joan. Within minutes we had a plan... and then of course we all immediately procrastinated until the day before GenCon.
Joan and Laura holed up together to get their assigned dice completed, and I imposed upon the ever gracious and always brilliant AntiCrafter Raellyn Hatter to keep me on target and tell me when I was being stupid, since I'm a total n00b when it comes to sewing. It turns out I had nothing to worry about, because she had me tracing, cutting, ironing, stuffing, and pinning like a boss while she handled the actual stitching.
Sadly, due to Joan's panel-hosting schedule and the fact that we sort of assumed Wil would still be at the con on Sunday, we didn't get to give them to him in person. But thanks to some help from Bonnie (and some other AntiCrafters), he knows they exist, and we'll be shipping them. I'll let y'all know if there's an update, such as AN AWESOME PHOTO OF WIL WITH THE PILLOWS.
*hint hint hint omg pretty please Wil?*
Suggested Entertainment
Go watch all the episodes of Geek DIY eventually, but start with Episode 3. It's the one that you can blame for this misadventure:
"Wil Wheaton Makes Dice Pillows - Geek DIY - Ep 3" with Bonnie Burton and Wil Wheaton
Difficulty
All Tied Up At the Moment
Click here for definitions of difficulty levels.
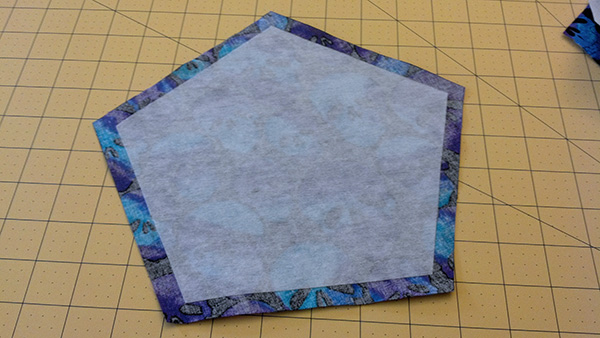
Finished Measurements
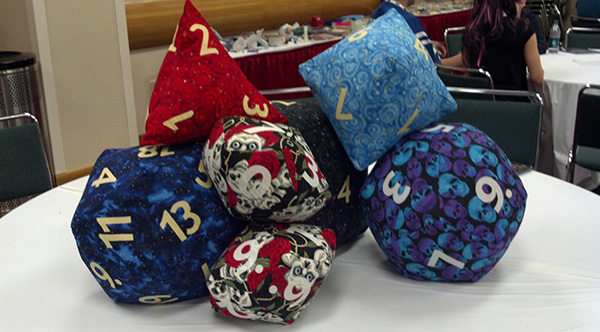
Varies depending on which die you are making, but they are all roughly 12"/30.5cm tall.
Download
Some of the die faces are larger than will comfortably fit on a sheet of US Letter sized paper (8.5" x 11"), so what I've done is put them over two or three sheets, with a dashed line down the center(s). Print them out onto some cardstock, line up the center lines (by cutting the two halves out or by overlapping two nearly-complete die face templates), and tape them together. The same works if your printer takes A4 paper (21cm x 29.7cm), just remember to tell it to NOT resize to fit the paper; it's ok if some width or height gets cut off, because you will have more than enough to work with to make a whole template. Numbers for the dice are also included in each template PDF.
d4 templates (pdf)
d6 templates (pdf)
d8 templates (pdf)
d10 templates (pdf)
d12 templates (pdf)
d20 templates (pdf)
Materials
- Quilting cotton, 1yd/1m of 45"-wide fabric per die
- Note: if you are using the same fabric for all your dice, you'll be able to use less fabric.
- Coordinating thread and bobbin
- Single-sided interfacing, 1yd/1m of 45"-wide interfacing per die
- Note: if you are making multiple dice, you'll be able to use less interfacing.
- Fiberfill, 12-18oz per die
- Iron-on numbers, check the template files for how many of each number
- Note: if you are making your own numbers, you'll need either
- double-sided interfacing an equal amount of contrasting fabric (cheap and looks good) OR
- printable iron-on fabric (expensive and looks fantastic)
- Note: if you are making your own numbers, you'll need either
Design Notes
All measurements include a .5"/1.25cm seam allowance. We know that's big for you experienced sewers, but if you're that experienced you can make adjustments accordingly.
All references to "left-hand side" or "right-hand side" assume you are looking at the die face referenced with the number on it right way up, as if you were reading it in a book. Example: Sew the seam along the left-hand side of the 8 would assume that even if you had just sewn the die face with the number 8 on it onto another die face, you would re-orient your fabric so that the 8 was right way up in front of you, and the "left" would be before the number 8 if you were reading it as an English sentence. "Right," then, would be after the number 8 if you were reading it as an English sentence. Jesus, Zabet, over-explain much?
A note on the interfacing: You can cut the interfacing to the same size as the fabric pieces, but keep in mind this will make your seams bulkier and it might give you trouble in the points where so many pieces of fabric come together. The other option is to cut your interfacing smaller than the fabric so that it falls just to the edge of your seam allowance and, in fact, in the template PDFs you will notice that the pieces marked "interfacing" are .5"/1.25cm smaller all the way around than the pieces marked "fabric." This allows you to also use the edge of the interfacing as a guide to keep your seams nice and straight if you are a less experienced sewer.
A note on the numbers: We used two different methods to get very similar numbers—quite accidentally, might I add! I think we even serendipitously chose the same font: Myriad. Both teams of crafters ended up making our own numbers because we couldn't find any nice, appropriately-sized, reasonably-priced, iron-on numbers locally and, of course, we had waited until too late to order some from the internet. I'll cover both methods in the directions below, but feel free to be smarter than us and track down premade iron-on numbers ahead of time. Look for something closer to 3"/7.5cm tall, but 2"/5cm will do in a pinch.
Remember to make two of the d10 so that you can roll percentages! And yes, the d10 in the photos are a little bit squat. We fixed that in these templates.
Normally we'd tell you to prewash and press your fabric before beginning a sewing project, but since these pillows are spot-clean only, you can probably get away without it. However, be sure to check the instructions on all of your iron-on materials first as they have different requirements about prewashing fabric.
The AntiCraft assumes any well stocked sewing room to have certain things on hand. (Click for our basic sewing items list.)
Cut Your Fabric:
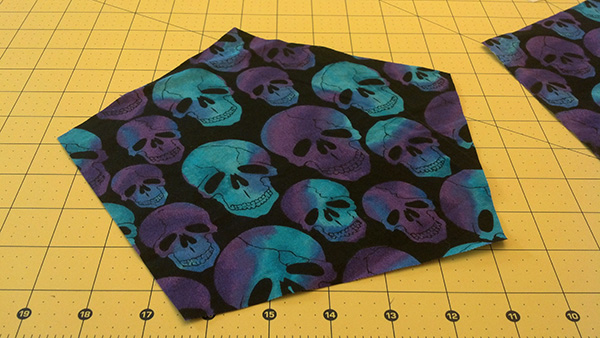
Download, print, and assemble (if necessary) the die fabric templates for the dice you want to make. Trace around the templates on the wrong side of your fabric, then cut them out with nice sharp scissors. We're going to assume here that you realize a d4 needs four faces, a d6 will need six, and so on, etc.
Interfacing:
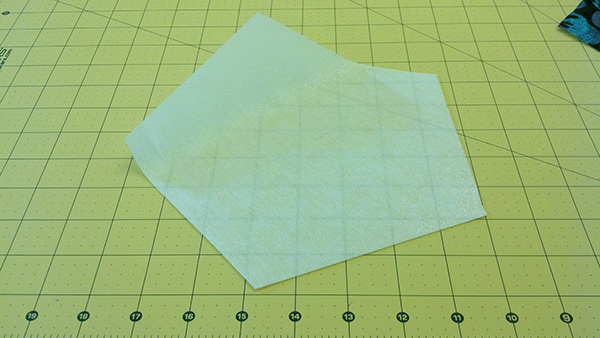
Option A (aka what Joan and Laura did): Using the die fabric templates you already have, trace onto either side of your single-sided interfacing, then cut them out with nice sharp scissors. You still need four faces for a d4, six for a d6, and so on, etc. This method is easier in that you only need the one template, but can be harder when you are turning your dice right-side out because of the added bulk of interfacing in your seams.
Option B (aka what Raellyn and Zabet did): Download, print, and assemble (if necessary) the die interfacing templates for the dice you want to make. Trace onto either side of your single-sided interfacing, then cut them out with nice sharp scissors. You still need four faces for a d4, six for a d6, and so on, etc. This method is easier for a new sewer because you can follow the edge of the interfacing to keep your seams straight (the interfacing templates have no seam allowance and go just to the edge of them), but is harder because you have to make a second set of templates and make sure you're cutting out the right one.
Attach the Interfacing to the Fabric:
Following the directions from the interfacing for heat setting, time, steam, etc., put the shiny side of your interfacing against the wrong side of the fabric and iron them together. Note that if you are using the smaller interfacing templates, you'll need to eyeball centering your interfacing on the fabric. Don't panic, it doesn't have to be perfect.
Numbers:
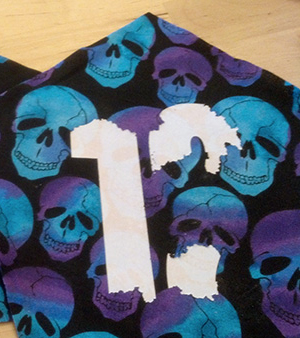
don't be a victim of shitty iron-on numbers
Option A (aka what none of us did): Buy premade numbers and iron them according to the directions on the package to the center of the right side of each die face. BEWARE CRAPPY IRON-ON NUMBERS, because you might end up with that nightmare photo over on the right and have to re-cut some pieces.
Option B (aka what Joan and Laura did): Make your own iron-on numbers with light-colored fabric and double-sided interfacing. Trace the template page(s) of bold numbers onto the shiny/rough side of the double-sided interfacing with an Ultra Sharp Sharpie®. Iron the interfacing to your contrasting fabric with the shiny/rough side to the fabric's wrong side. Be sure to follow the directions from the interfacing as to heat setting, time, steam, etc. Allow your interfaced fabric to cool. You will still be able to make out the lines through the fabric. Cut the numbers out carefully with sharp scissors. Peel away the backing on the unused side of the interfacing and iron the numbers onto the center of the right side of each die face.
Option C (aka what Raellyn and Zabet did): Make your own iron-on numbers with printable iron-on fabric and lots of dollars. Seriously, it was like $15 for three US Letter sized sheets of printable fabric, but we were running out of time and getting desperate. On the plus side, those suckers are NOT peeling up or fraying or anything. Print the template pages of light numbers onto the fabric and cut out with sharp scissors. Iron the numbers onto the center of the right side of each die face according to the directions on the packaging.
(Can I just say that Raellyn suggested Option B first, but I was all Oh no, Option A, bitches! because I thought it would save time. But then I fell prey to the shitty iron-on numbers and we ended up wasting 4 or 5 hours in total if you count up driving around to different craft stores, trying and failing with the shitty numbers, and then crying my eyes out while Raellyn patted me on the back with some soothing there there noises. The moral of this story? RAELLYN IS ALWAYS RIGHT. I mean, don't get me wrong, our numbers came out fantastic, but the time and money spent didn't really make it worth our while in the end.)
Stitching together:
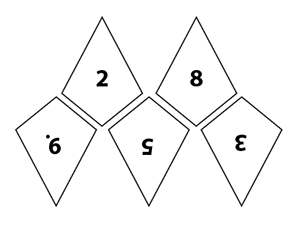
It will really help you if you have some dice to use as guides handy during this step, or can search up some images on the internet. Note that not all dice have their numbers in the same spots, so in the end, go with what you like.
The d4 and the d6 are made slightly differently from the others; you will put several sides together and then add the last side as a lid. The d8, d10, d12, and d20 are made by attaching two "hemispheres" together around the middle into a complete die.
jump to d4 | jump to d6| jump to d8 | jump to d10 | jump to d12 | jump to d20
Step 1: Find the two die faces that have a 1 and 4 on them. Place them right sides together, with the 1s and 4s kissing. Don't worry that the remaining corner has non-matching numbers in it. Sew a seam along the 1 and 4 side.
Step 2: Next get an unattached die face that has a 1, a 2, and a 3 on it. Place it right sides together to the die face that also has a 1 and 3, with the 1s and 3s again kissing. Sew a seam along the 1 and 3 side. You now have three triangles stitched together in a row (it's really more like a semicircle, but you get the idea). The left and right ends which aren't yet sewn to anything should have a 1 and a 2 on them.
Step 3: Turn your row into a little tent by kissing the 1s and 2s from each end together and sewing that seam.
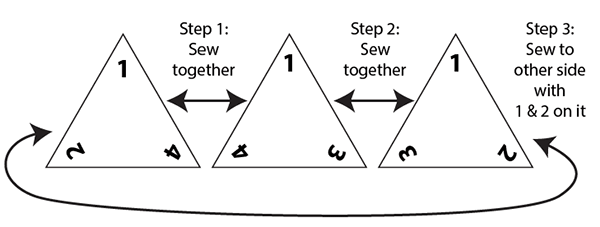
Step 4: Turn your little tent into a proper pyramid by matching up the last die face so that the 2s, 3s, and 4s are all in corners together. If you've not yet been pinning things together, you might need to in this step. Sew all but half of one seam.
You're ready to finish your die. You can skip down to Stuffing or make more die bodies before moving on to the next section of instructions.
jump to d4 | jump to d6| jump to d8 | jump to d10 | jump to d12 | jump to d20
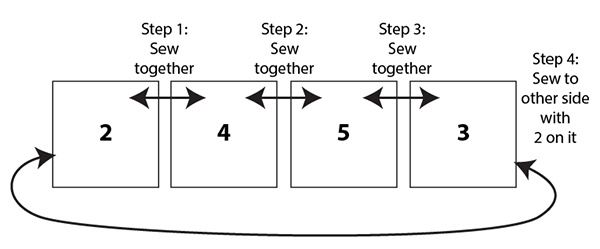
Step 1: Find the die faces with 2 and 4 on them. Place them right sides together, with the numbers kissing. Sew a seam along the right-hand side of the 2.
Step 2: Next get the die face that has a 5 on it. Place it right sides together to the die face that has the 4 on it, again with the numbers kissing. Sew a seam along the right-hand side of the 4.
Step 3: Next get the die face that has a 3 on it. Place it right sides together to the die face that has the 5 on it, again with the numbers kissing. Sew a seam along the right-hand side of the 5. You now have four squares stitched together in a row.
Step 4: Turn your row into a tube by kissing the 3 and the 2 together and sewing that seam.
Step 5: Turn your tube into a boxy bowl by matching up the die face with the 6 on it to either the top of bottom of the tube. If you've not yet been pinning things together, you might need to in this step. Sew all around the tube.
Step 6: Turn your boxy bowl into a proper cube by doing the same thing to the other side of the tube with the die face that has a 1 on it. If you've not yet been pinning things together, you might need to in this step. Sew all around the tube except for half of one of the squares.
You're ready to finish your die. You can skip down to Stuffing or make more die bodies before moving on to the next section of instructions.
jump to d4 | jump to d6| jump to d8 | jump to d10 | jump to d12 | jump to d20
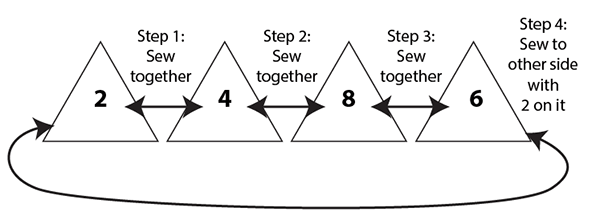
Putting together the d8 is a lot like putting together the d4, but without so many damn numbers to worry about. Start by putting together a hemisphere (um... hemioctahedron?) of even numbers, then a hemisphere of odd numbers, then attach them together.
Step 1: Find the die faces with 2 and 4 on them. Place them right sides together, with the numbers kissing. Sew a seam along the right-hand side of the 2.
Step 2: Next get the die face that has a 8 on it. Place it right sides together to the die face that has the 4 on it, again with the numbers kissing. Sew a seam along the right-hand side of the 4.
Step 3: Next get the die face that has a 6 on it. Place it right sides together to the die face that has the 8 on it, again with the numbers kissing. Sew a seam along the right-hand side of the 8. You now have four triangles stitched together in a row.
Step 4: Turn your line into a little tent by kissing the 6 and the 2 together and sewing that seam.
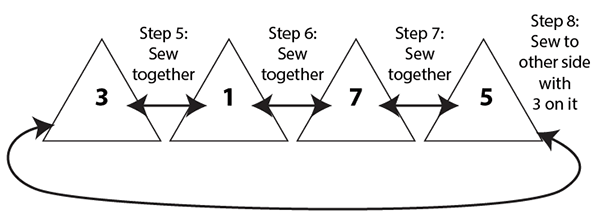
Step 5: Now let's do the odd-numbered hemisphere. Find the die faces with 3 and 1 on them. Place them right sides together, with the numbers kissing. Sew a seam along the right-hand side of the 3.
Step 6: Next get the die face that has a 7 on it. Place it right sides together to the die face that has the 1 on it, again with the numbers kissing. Sew a seam along the right-hand side of the 1.
Step 7: Next get the die face that has a 5 on it. Place it right sides together to the die face that has the 7 on it, again with the numbers kissing. Sew a seam along the right-hand side of the 7. You now have four triangles stitched together in a row.
Step 8: Turn your line into a little tent by kissing the 5 and the 3 together and sewing that seam.
Step 9: Turn your two little tents into a proper octahedron by turning the even-numbered hemisphere on its point (right side in) and placing the odd numbered hemisphere inside it (right side out) as if to stack a set of bowls. Make sure that the 2 and the 3 are kissing; the other numbers will then be correctly aligned. If you've not yet been pinning things together, you might need to in this step. Sew around the equator all but half of one seam.
You're ready to finish your die. You can skip down to Stuffing or make more die bodies before moving on to the next section of instructions.
jump to d4 | jump to d6| jump to d8 | jump to d10 | jump to d12 | jump to d20
Putting together the d10 is a little more challenging, since the "equator" seam that will attach the two hemispheres has a zig-zag to it and the die faces are offset from each other. Other than that, it's put together in the same way as the d8.
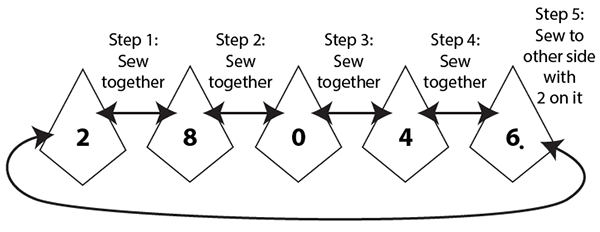
Step 1: Let's start with the even-numbered hemisphere. Find the die faces with 2 and 8 on them. Place them right sides together, with the numbers kissing. Sew the upper, long side seam along the right-hand side of the 2. The short bottom sides will make up the zig-zag of the equator, so for now only sew the long sides.
Step 2: Next get the die face that has a 0 on it. Place it right sides together to the die face that has the 8 on it, again with the numbers kissing. Sew the long side seam along the right-hand side of the 8.
Step 3: Next get the die face that has a 4 on it. Place it right sides together to the die face that has the 0 on it, again with the numbers kissing. Sew the long side seam along the right-hand side of the 0.
Step 4: Next get the die face that has a 6 on it. Place it right sides together to the die face that has the 4 on it, again with the numbers kissing. Sew the long side seam along the right-hand side of the 4. You now have a row of five kinda-diamond-shaped pieces.
Step 5: Turn your row into a little tent by kissing the 6 and the 2 together and sewing that long side seam.
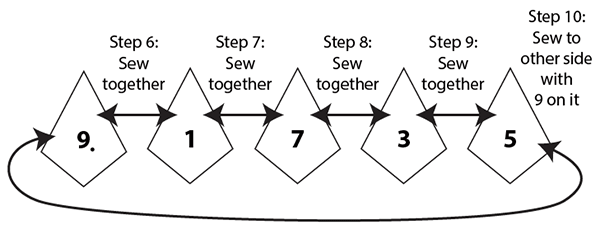
Step 6: Now we'll do the odd-numbered hemisphere. Find the die faces with 9 and 1 on them. Place them right sides together, with the numbers kissing. Sew the long side seam along the right-hand side of the 9.
Step 7: Next get the die face that has a 7 on it. Place it right sides together to the die face that has the 1 on it, again with the numbers kissing. Sew the long side seam along the right-hand side of the 1.
Step 8: Next get the die face that has a 3 on it. Place it right sides together to the die face that has the 7 on it, again with the numbers kissing. Sew the long side seam along the right-hand side of the 7.
Step 9: Next get the die face that has a 5 on it. Place it right sides together to the die face that has the 3 on it, again with the numbers kissing. Sew the long side seam along the right-hand side of the 3. You now have a row of five kinda-diamond-shaped pieces.
Step 10: Turn your row into a little tent by kissing the 5 and the 9 together and sewing that long side seam.
the offset, zig-zag equator
(shown flattened)
Step 11: Turn your two little tents into a proper pentagonal trapezohedron by turning the even-numbered hemisphere on its point (right side in) and placing the odd numbered hemisphere inside it (right side out) as if to stack a set of bowls. This is where it gets difficult, because the two hemispheres are offset from each other by half a die face.
Make sure that the lower, short sides of the 2 match up to one lower, short side of the 9 on the left and the 5 on the right; all the other numbers should then match up. If you've not yet been pinning things together, you might need to in this step. Sew around the equator all but half of one seam.
You're ready to finish your die. You can skip down to Stuffing or make more die bodies before moving on to the next section of instructions.
jump to d4 | jump to d6| jump to d8 | jump to d10 | jump to d12 | jump to d20
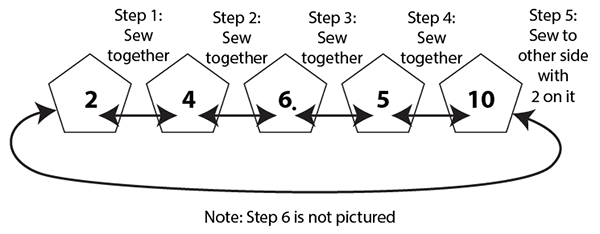
Putting together the d12 is like a combination of putting together the d6, since you will need to make a bowl, and the d10, since you have a zig-zag equator and the die faces are offset from each other.
Step 1: Let's start with the mostly even-numbered hemisphere. Find the die faces with 2 and 4 on them. Place them right sides together, with the numbers kissing. Sew the lower side seam along the right-hand side of the 2. The upper sides will make up the zig-zag of the equator, so for now only sew the lower sides.
Step 2: Next get the die face that has a 6 on it. Place it right sides together to the die face that has the 4 on it, again with the numbers kissing. Sew the lower side seam along the right-hand side of the 4.
Step 3: Next get the die face that has a 5 on it. Place it right sides together to the die face that has the 6 on it, again with the numbers kissing. Sew the lower side seam along the right-hand side of the 6.
Step 4: Next get the die face that has a 10 on it. Place it right sides together to the die face that has the 5 on it, again with the numbers kissing. Sew the lower side seam along the right-hand side of the 5. You now have a row of five pentagon-shaped pieces.
Step 5: Turn your row into a tube by kissing the 10 and the 2 together and sewing that lower side seam.
Step 6: Turn your tube into a bowl by taking the die face with the 1 on it and sewing it to the side of the tube that has a straight edge, i.e. the bottom edge of the pentagons in the tube when the numbers are facing right way up. (Remember, the tops of the pentagons are going to become the zig-zag equator seam.) If you've not yet been pinning things together, you might need to in this step, and be sure to keep the right sides of the fabric facing each other. Sew the straight seam all around that side of the tube.
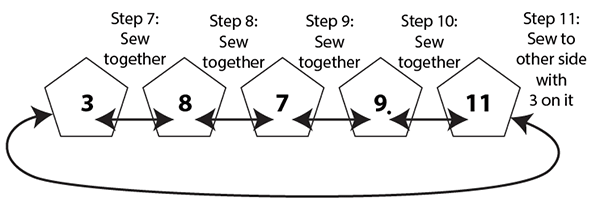
Step 7: Now we'll do the mostly odd-numbered hemisphere. Find the die faces with 3 and 8 on them. Place them right sides together, with the numbers kissing. Sew the lower side seam along the right-hand side of the 3.
Step 8: Next get the die face that has a 7 on it. Place it right sides together to the die face that has the 8 on it, again with the numbers kissing. Sew the lower side seam along the right-hand side of the 8.
Step 9: Next get the die face that has a 9 on it. Place it right sides together to the die face that has the 7 on it, again with the numbers kissing. Sew the lower side seam along the right-hand side of the 7.
Step 10: Next get the die face that has a 11 on it. Place it right sides together to the die face that has the 9 on it, again with the numbers kissing. Sew the lower side seam along the right-hand side of the 9. You now have a row of five pentagon-shaped pieces.
Step 11: Turn your row into a tube by kissing the 11 and the 3 together and sewing that lower side seam.
Step 12: Turn your tube into a bowl by taking the die face with the 12 on it and sewing it to the side of the tube that has a straight edge, i.e. the bottom edge of the pentagons in the tube when the numbers are facing right way up. (Remember, the tops of the pentagons are going to become the zig-zag equator seam.) If you've not yet been pinning things together, you might need to in this step, and be sure to keep the right sides of the fabric facing each other. Sew the straight seam all around that side of the tube.

the offset, zig-zag equator
(shown flattened)
Step 13: Turn your two bowls into a proper dodecahedron by setting the mostly even-numbered hemisphere on its flat bottom (right side in) and stacking the mostly odd-numbered hemisphere inside it (right side out). This is where it gets difficult, because the two hemispheres are offset from each other by half a die face.
Make sure that the top sides of the 8 match up to one top side of the 4 on the left and the 2 on the right; all the other numbers should then match up. If you've not yet been pinning things together, you might need to in this step. Sew around the equator all but half of one seam.
You're ready to finish your die. You can skip down to Stuffing or make more die bodies before moving on to the next section of instructions.
jump to d4 | jump to d6| jump to d8 | jump to d10 | jump to d12 | jump to d20
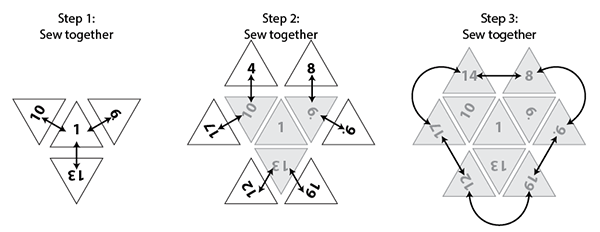
Putting together the d20 is a huge pain in the ass. Have fun! This time, instead of making a tube and turning it into a bowl by adding a lid, we're going to start with the lid piece and turn it into a bowl. Not a bowel, even though I keep typing it that way for some reason. A bowl. A d20 will also have a zig-zag equator seam.
Step 1: For the first hemisphere, find the die faces with the 1, 10, 6, and 13 on them. The 1 is going to be the bottom of the bowl; the 10, 6, and 13 should be oriented with their base sides (the bottom side of the die face's triangle when you're looking at the number right way up) each attaching to a side of the 1.
Start by kissing the 10 to the 1 (right sides of fabric facing) and sew the side seam along the left-hand side of the 1.
Kiss the 6 to the 1 and sew the side seam along the right-hand side of the 1.
Finally, kiss the 13 to the 1, and sew the side seam along the bottom of the 1.
You just made a small triangle (the 1) into a larger, inverted triangle.
Step 2: Next get the 17, 4, 8, 9, 19, and 12. This time we will be sewing onto the 10, 6, and 13; all die faces that you sew on in this step should be oriented with their base sides each attaching to a side of the die face specified.
Start by kissing the 17 to the 10 (right sides of fabric facing) and sew the side seam along the left-hand side of the 10.
Kiss the 4 to the 10 and sew the side seam along the right-hand side of the 10.
Kiss the 8 to the 6 and sew the side seam along the left-hand side of the 6.
Kiss the 9 to the 6 and sew the side seam along the right-hand side of the 6.
Kiss the 19 to the 13 and sew the side seam along the left-hand side of the 13.
Finally, kiss the 12 to the 13 and sew the side seam along the right-hand side of the 13.
You now have a large, flat, strangely-shaped piece of fabric.
Step 3: Time to turn it into a bowl.
Start by kissing the 14 to the 8 (right sides of fabric facing) and sew the side seam along the left-hand side of the 8.
Kiss the 9 to the 19 and sew the side seam along the left-hand side of the 19.
Kiss the 12 to the 17 and sew the side seam along the left-hand side of the 17.
Kiss the 17 to the 14 and sew the side seam along the left-hand side of the 14.
Kiss the 8 to the 9 and sew the side seam along the left-hand side of the 9.
Finally, kiss the 19 to the 12 and sew the side seam along the left-hand side of the 12.
Step 4: Now we'll do the second hemisphere. Find the die faces with the 20, 14, 11, and 7 on them. The 20 is going to be the bottom of the bowl; the 14, 11, and 7 should be oriented with their base sides (the bottom side of the die face's triangle when you're looking at the number right way up) each attaching to a side of the 20.
Start by kissing the 14 to the 20 (right sides of fabric facing) and sew the side seam along the left-hand side of the 20.
Kiss the 11 to the 20 and sew the side seam along the right-hand side of the 20.
Finally, kiss the 7 to the 20, and sew the side seam along the bottom of the 20.
You just made a small triangle (the 20) into a larger, inverted triangle.
Step 5: Next get the 15, 18, 16, 3, 2, and 5. This time we will be sewing onto the 14, 11, and 7; all die faces that you sew on in this step should be oriented with their base sides each attaching to a side of the die face specified.
Start by kissing the 15 to the 14 (right sides of fabric facing) and sew the side seam along the left-hand side of the 14.
Kiss the 18 to the 14 and sew the side seam along the right-hand side of the 14.
Kiss the 16 to the 11 and sew the side seam along the left-hand side of the 11.
Kiss the 3 to the 11 and sew the side seam along the right-hand side of the 11.
Kiss the 2 to the 7 and sew the side seam along the left-hand side of the 7.
Finally, kiss the 5 to the 7 and sew the side seam along the right-hand side of the 7.
You now have a large, flat, strangely-shaped piece of fabric.
Step 6: Time to turn it into a bowl.
Start by kissing the 18 to the 16 (right sides of fabric facing) and sew the side seam along the left-hand side of the 16.
Kiss the 3 to the 2 and sew the side seam along the left-hand side of the 2.
Kiss the 5 to the 15 and sew the side seam along the left-hand side of the 15.
Kiss the 15 to the 18 and sew the side seam along the left-hand side of the 18.
Kiss the 16 to the 3 and sew the side seam along the left-hand side of the 3.
Finally, kiss the 2 to the 5 and sew the side seam along the left-hand side of the 5.


the zig-zag equator
(shown flattened)
Step 7: Turn your two bowls into a proper icosahedron by setting the first hemisphere on its flat bottom (right side in) and placing the second numbered hemisphere inside it (right side out) as if to stack a set of bowls. You are, in fact, stacking a set of bowls. [Editor's note: Literally, Adam Ford. Literally.]
Line up the hemispheres (er, hemiicosahedrons?) so that the right side of the 15 is with the right side of the 17 and the left side of the 18 is with the left side of the 12. Pin the fuck out of it. Sew around the equator all but half of one seam.
NOTE: So I was just talking to my friend Matt Robertson and he wondered why we just didn't do it like this. I said because shut up, that's why.
You're ready to finish your die. You can skip down to Stuffing or make more die bodies before moving on to the next section of instructions.
jump to d4 | jump to d6| jump to d8 | jump to d10 | jump to d12 | jump to d20
Let's stuff these motherfucking things and be done already, shall we?
Ok, so next up you'll need to turn all your die bodies right side out if you haven't yet. Be careful about it; you don't want to rip any stitches.
Stuff them with fiberfill. Make sure to get the corners really well! My personal method was to stuff the die until it seemed full, then get in there with a disposable chopstick (because they are rough and catch the fiberfill) to really pack it into the corners. This sort of hollowed out the ball of fiberfill I had put in there, so then I would add more fiberfill into the hollow. Then I'd check my corners and get in there with a chopstick again and refill the hollow as necessary. This keeps the die from being rounded and pouffy on the sides and/or saggy at the corners. It is going to take more fiberfill than you think it will—probably twice as much!
Finishing:
Time to sew up those raw-edged, gaping holes we left in the lid seams and equator seams! Fold the seam allowance in onto itself and pin the die shut as you go. You will probably also find you need to add a little more fiberfill at this point. Well, go on and do it. Stuff it! Don't be shy. It's a little late for shyness now, isn't it? Get in there with the chopstick if you have to, ungh, yeah! The pinning should be pretty hard to do because your die is so full and tight. (Oh Dear Gods, this does just keep going downhill, doesn't it?) Mind your fingers, blood is difficult to get out of fabric! (Actually, hydrogen peroxide works really well. You don't want to know why I know.)
Now sew those holes closed using a blind stitch. Don't know how to blind stitch? Check out this video, because I'm too damn knackered to explain it. Aaaaaand, you're done! Enjoy your dice! Craftbomb celebrities with them! Have RPG sleepovers! Freak out the Muggles!
About
 contact Zabet:
• legal info
contact Zabet:
• legal info
![]()