

 |
 |
Mini-Issue #5 |
 |
 |
 |
This was suggested at the last minue, and I do mean the very last minute. I don't really play Magic: The Gathering, but I know people who do, and I was asked to include a pattern for a spindown die even though all I know about it is that it is a d20 with special numbering pattern. Well, hey, I'm happy to please more than one kind of geek at a time!
Or at least, that's what they write about me on the internet...
Difficulty
All Tied Up At the Moment
Click here for definitions of difficulty levels.
Finished Measurements
Roughly 12"/30.5cm tall.
Download
The die face is larger than will comfortably fit on a sheet of US Letter sized paper (8.5" x 11"), so what I've done is put it over two, with a dashed line down the center. Print the templates out onto some cardstock, line up the center lines (by cutting the two halves out or by overlapping two nearly-complete die face templates), and tape them together. The same works if your printer takes A4 paper (21cm x 29.7cm), just remember to tell it to NOT resize to fit the paper; it's ok if some width or height gets cut off, because you will have more than enough to work with to make a whole template. Numbers for the die are also included in the PDF.
spindown d20 templates (pdf)
Materials
- Quilting cotton, 1yd/1m of 45"-wide fabric
- Note: if you are using the same fabric for all your dice, you'll be able to use less fabric.
- Coordinating thread and bobbin
- Single-sided interfacing, 1yd/1m of 45"-wide interfacing per die
- Fiberfill, 18-20oz
- Iron-on numbers, check the template files for how many of each number
- Note: if you are making your own numbers, you'll need either
- double-sided interfacing an equal amount of contrasting fabric (cheap and looks good) OR
- printable iron-on fabric (expensive and looks fantastic)
- Note: if you are making your own numbers, you'll need either
Design Notes
Same as for the Awesome Dice of Awesomeness, so please go have a read before you try to make this die!
This pattern is a variation on the d20 pattern from the Awesome Dice of Awesomeness set, therefore I'm going to refer you back to that pattern for everything except for the die face layout.
Cut Your Fabric:
As per the Awesome Dice of Awesomeness.
Interfacing:
As per the Awesome Dice of Awesomeness.
Numbers:
As per the Awesome Dice of Awesomeness.
Note that on a spindown counter, the 20 is usually replaced by a symbol. Some possible symbols are included on the last pages of the spindown d20 templates PDF.
Stitching together:
The d20 is made by sewing two "hemispheres" and then attaching them together around the middle into a complete die.
We're going to start with a base piece and turn it into a bowl. A d20 will also have a zig-zag equator seam.
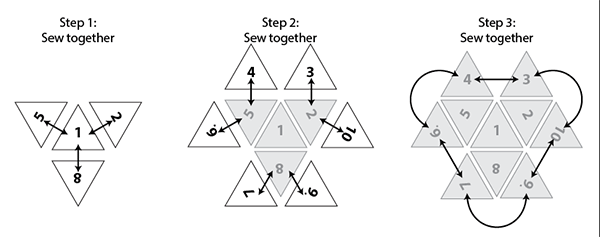
Step 1: For the first hemisphere, find the die faces with the 1, 5, 2, and 8 on them. The 1 is going to be the bottom of the bowl; the 2, 5, and 8 should be oriented with their base sides (the bottom side of the die face's triangle when you're looking at the number right way up) each attaching to a side of the 1.
Start by kissing the 5 to the 1 (right sides of fabric facing) and the sew side seam along the left-hand side of the 1.
Kiss the 2 to the 1 and sew the side seam along the right-hand side of the 1.
Finally, kiss the 8 to the 1, and sew the side seam along the bottom of the 1.
You just made a small triangle (the 1) into a larger, inverted triangle.
Step 2: Next get the 3, 4, 6, 7, 9, and 10. This time we will be sewing onto the 5, 2, and 8; all die faces that you sew on in this step should be oriented with their base sides each attaching to a side of the die face specified.
Start by kissing the 6 to the 5 (right sides of fabric facing) and the sew side seam along the left-hand side of the 5.
Kiss the 4 to the 5 and sew the side seam along the right-hand side of the 5.
Kiss the 3 to the 2 and sew the side seam along the left-hand side of the 2.
Kiss the 10 to the 2 and sew the side seam along the right-hand side of the 2.
Kiss the 9 to the 8 and sew the side seam along the left-hand side of the 8.
Finally, kiss the 10 to the 8 and sew the side seam along the right-hand side of the 8.
You now have a large, flat, strangely-shaped piece of fabric.
Step 3: Time to turn it into a bowl.
Start by kissing the 4 to the 3 (right sides of fabric facing) and the sew side seam along the left-hand side of the 3.
Kiss the 10 to the 9 and sew the side seam along the left-hand side of the 9.
Kiss the 7 to the 6 and sew the side seam along the left-hand side of the 6.
Kiss the 6 to the 4 and sew the side seam along the left-hand side of the 4.
Kiss the 3 to the 10 and sew the side seam along the left-hand side of the 10.
Finally, kiss the 9 to the 7 and sew the side seam along the left-hand side of the 7.
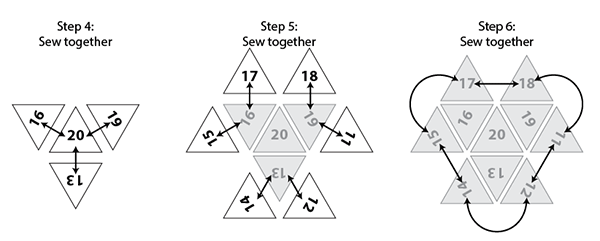
Step 4: Now we'll do the second hemisphere. Find the die faces with the 16, 19, 13, and 20 on them. The 20 is going to be the bottom of the bowl; the 16, 19, and 13 should be oriented with their base sides (the bottom side of the die face's triangle when you're looking at the number right way up) each attaching to a side of the 20.
Start by kissing the 16 to the 20 (right sides of fabric facing) and the sew side seam along the left-hand side of the 1.
Kiss the 19 to the 20 and sew the side seam along the right-hand side of the 20.
Finally, kiss the 13 to the 20, and sew the side seam along the bottom of the 20.
You just made a small triangle (the 20) into a larger, inverted triangle.
Step 5: Next get the 15, 16, 18, 11, 12, and 13. This time we will be sewing onto the 16, 19, and 13; all die faces that you sew on in this step should be oriented with their base sides each attaching to a side of the die face specified.
Start by kissing the 15 to the 16 (right sides of fabric facing) and the sew side seam along the left-hand side of the 16.
Kiss the 17 to the 16 and sew the side seam along the right-hand side of the 16.
Kiss the 18 to the 19 and sew the side seam along the left-hand side of the 19.
Kiss the 11 to the 19 and sew the side seam along the right-hand side of the 19.
Kiss the 12 to the 14 and sew the side seam along the left-hand side of the 14.
Finally, kiss the 13 to the 14 and sew the side seam along the right-hand side of the 14.
You now have a large, flat, strangely-shaped piece of fabric.
Step 6: Time to turn it into a bowl.
Start by kissing the 17 to the 18 (right sides of fabric facing) and the sew side seam along the left-hand side of the 18.
Kiss the 11 to the 12 and sew the side seam along the left-hand side of the 12.
Kiss the 14 to the 15 and sew the side seam along the left-hand side of the 15.
Kiss the 15 to the 17 and sew the side seam along the left-hand side of the 17.
Kiss the 18 to the 11 and sew the side seam along the left-hand side of the 11.
Finally, kiss the 12 to the 14 and sew the side seam along the left-hand side of the 14.
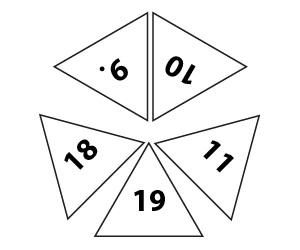
the zig-zag equator
(shown flattened)
Step 7: Turn your two bowls into a proper icosahedron by setting the first hemisphere on its flat bottom (right side in) and placing the second numbered hemisphere inside it (right side out) as if to stack a set of bowls. You are, in fact, stacking a set of bowls. [Editor's note: Still literally, Adam Ford. Still literally.]
Line up the hemispheres (er, hemiicosahedrons?) so that the right side of the 9 is with the right side of the 18 and the left side of the 110 is with the left side of the 11. Pin the fuck out of it. Sew around the equator all but half of one seam.
Stuffing:
As per the Awesome Dice of Awesomeness.
Finishing:
As per the Awesome Dice of Awesomeness.
About
 contact Zabet:
• legal info
contact Zabet:
• legal info
![]()