

 |
 |
 |
 |
 |
 |
Comparative Calaveras
In Mexico and other Central and South American countries, November first and second are celebrated as Los Días de los Muertos (or Días de Muertos), a celebration of the beloved dead. A common decoration and treat for the festivities is the Calvera de Azucar, or Sugar Skull. Molded of sugar and decorated with colored icings, foils, feathers and beads, the skulls adorn ofrendas, shrines, honoring loved ones who have passed away. Nestled among the traditional marigolds and papel picados, some of the skulls are truly works of art.
There are two basic kinds of recipes on the internet for sugar skulls. The first is a mixture of dampened granulated sugar and meringue powder, pressed into a mold. The second creates a modeling clay from powdered sugar, using egg white and corn syrup as binders. I tried them both.
Meringue and Sugar
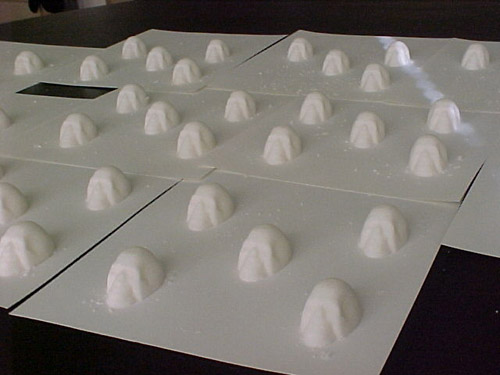
Carin Huber (photo)
click image to enlarge
Meringue powder can be difficult to find locally. Look for it in confectionery supply stores, which are a good place to find skull molds as well. [Editor's note: Big box stores that carry cake decorating supplies are a good place to try.] Your best time to look for skull molds in stores is August and September. That's when the stores expect candy makers to be gearing up for Hallowe'en, and if you don't get there early enough, they could be sold out by October. The sugar mixture will work well in most other mold shapes, as well, if something catches your eye while you're shopping. You can buy meringue powder and molds online, of course, but if you can find them locally, you'll avoid paying for shipping.
Once I had gotten the meringue powder and the molds, the hardest part became finding good weather. Living a mile from the San Francisco bay, this was more difficult than you might think. A lot of sugar-based candies require dry weather to turn out well, and sugar skulls are no exception. If there is too much humidity in the air, the sugar will absorb it, and your skulls will never harden enough to be handled for decorating. After collecting my materials, I waited and watched, and finally was blessed with beautiful weather on a day when I had nothing else to do.
The recipe for the molding mix called for one teaspoon of meringue powder mixed into each cup of granulated sugar (I used three cups of sugar total), then sprinkled with a teaspoon of water for each cup of sugar. The directions I was using (which came with my skull mold) said that the sugar mixture should feel "like cool 'beach sand'." The amount of water I started with wasn't quite enough, but it took less than half a teaspoon more to reach the desired consistency. When I squeezed some of the mixture in my hand, it held together in the form it took from my fingers. From there, it was just a matter of packing the molds, scraping the backs smooth, and carefully turning the skulls out onto card stock to dry. With the mini skull mold, three cups of sugar yielded exactly 48 skulls, 1 1/2 inches tall by 1 1/4 inches wide, by 3/4 of an inch thick. Once the skulls were dry, I kept them on a baking sheet in my gas oven, where the pilot light helped to keep them dry and dust-free until they could be decorated.
Pros:
- Easy to mix
- Easy to adjust moisture content
- Molds eliminate need for sculpting skills
- Uniformity in skulls
Cons:
- Difficult to find ingredient
- Skulls are very delicate until dry and hard
- Shapes limited to the molds you can find, though this isn't all that limiting
Sugared Dough
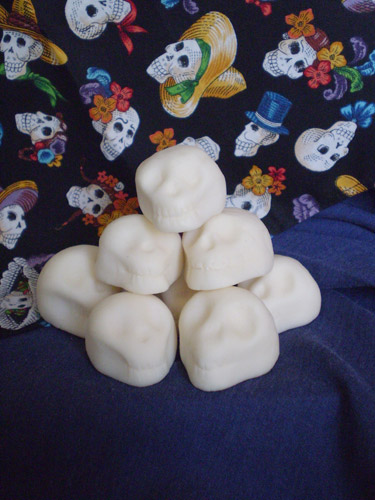
Carin Huber (photo)
click image to enlarge
The dough recipe gave me much more trouble. To begin with, the recipe I used called for the white of one egg, one tablespoon of corn syrup, half a teaspoon of vanilla extract, and two cups of powdered sugar. This does not make dough, I don't care if you're in the middle of the Sahara desert at high noon on summer solstice. I got a thick sugar glaze that would have topped doughnuts well. The addition of another cup of powdered sugar thickened the mixture into a dough that could be worked with the hands. I kneaded the dough on a sheet of waxed paper, dusted with corn starch, until it had a smooth consistency. I wrapped the dough in some waxed paper and refrigerated it for several hours, to give it a chance to rest and stiffen up a bit.
About eight hours later, I took the dough out to try sculpting some skulls. Chilling it did stiffen it up, but as it warmed from being worked, the dough began to relax and slump again, not turning liquid, but not holding it's shape either. I spent half an hour kneading as much more powdered sugar as I could into the dough, which turned out to be about half a cup more. A few more hours in the fridge, and I had a nice stiff dough indeed. Yes, it was quite stiff. And dry. A a bit crumbly, too. Oh, well, it was still workable, and a damp paper towel helped to smooth out the cracks that formed in my pathetic attempts at "skulls." I wrapped part of the dough in the damp paper towel and stuck it back in the fridge until the next day. This didn't seem to change the consistency of the dough at all, although it's possible that the damp towel kept the dough from drying out further. The remainder of the dough worked up like the first half had, with the same problems and the same solutions. I did try molding the dough in my skull molds, but it would not come out of the mold. Dusting the mold with corn starch did not help at all. From about three and a half cups of powdered sugar, I made a dozen small skulls, slightly larger than the ones made from granulated sugar, plus a tiny pumpkin with a clove for a stem. They took a day and a half to dry.
Pros:
- All ingredients readily available in most grocery stores
- Shape can be anything you can imagine and sculpt
- Skulls handle well, though rough handling before they're dry will warp them
- Unique handcrafted character
Cons:
- More time intensive
- Harder to balance moisture content
- Some sculpting skill required
- Low yield compared to granulated sugar method
Decorating
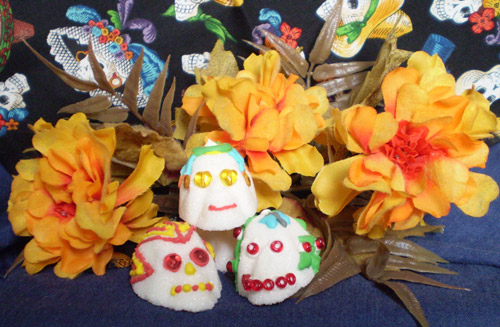
Carin Huber (photo)
click image to enlarge
Decorating the skulls (I've only decorated the molded skulls, so far) was done with a simple royal icing, colored with gel food colors I found at the local confectionery supply shop. I chose a red, a blue, and a yellow, and mixed other colors from those. Regular food coloring available from the grocery store will work, but the colors won't be nearly as intense. Remember to keep extra royal icing in a sealed bag, with all the air squeezed out, or it will harden before you can use it. Beads and sequins also found use as decorations, "glued" on with dots of icing. I purchased colorful foil paper and feathers to use, but the skulls were too small for them to work well. I plan to buy molds for larger skulls this year, so the foils and feathers will get their chance to shine!
home • antifesto • this issue • archive • submit • errata • masthead • contact us • legal