

 |
 |
 |
 |
 |
 |
 |
 |
Sparrow Kelley (photo)
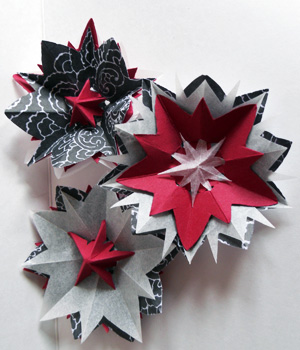
Real flowers are pretty, but like a lot of things in life they die and decay all too quickly. With only a pair of scissors, some glue, and a little paper savvy you can make these kirigami flowers as a replacement.
Suggested Listening
"Imaginary" by Evanescence
Difficulty
Cut and Paste
Click here for definitions of difficulty levels.
Download
Starburst Fold Instructions (pdf format)
Kikuka Cut Lines (pdf format)
Finished Measurements
Flowers will be about 3"/7.6 cm across.
Materials
- A clean, flat surface to work on
- Three 3"x3"/7.6 cmx7.6 cm squares of paper
- Bone folder
- Pencil
- Sharp scissors
- Glue
- Toothpicks
Design Notes
Kirigami is a Japanese art, similar to origami. Where origami is folded, kirigami is folded and cut. Like origami, kirigami has standard bases as starting points. Some of these are the snowflake, spider, starburst, and quilt folds. For this project you will need to learn the starburst fold.
Paper and Folding:
Origami paper is pretty and durable, but you can use any kind of paper you want. Remember that the thinner the paper, the easier it will be to fold and cut. Tracing paper, scrapbooking paper, magazine pages, and wrapping paper are good substitutes. Im using a mix of scrapbooking paper, tracing paper, and cardstock. Match up corners and edges before creasing, and always crease from the center out. Make your folds very precise. Use a bone folder to crease them, or use your finger nail or the edge of a clean ruler if you don't have a bone folder.
Scissors and Cutting:
Its generally a good idea to have a specific pair of scissors for paper projects, as paper dulls blades very quickly. Always cut into corners rather than trying to start in a corner and cut outwards. Use the back of your scissors, the part of the blade closest to the handle, instead of the tips. If you have very thick paper, or difficult cuts to make, you can use a hobby knife instead of scissors.
Glue:
I prefer Aleenes tacky glue, but Elmers will work just fine.
Step One:
Fold all three pieces of your paper. Always fold so that the right side is on the inside. Follow the diagram for the spider fold.
Step Two:
Draw the design on your paper with a pencil and cut it out. Use the illustration as a guide; yours doesnt have to be exactly the same. Unfold to see your design.
Step Three:
Fold your flower into a three dimensional shape. To do this alternate mountain and valley folds along the petals. To make the center of the flower pop up, fold the center creases the opposite way; i.e. mountain fold the valley folds, and valley fold the mountain folds. This part can be a little tricky, so you may want to practice it a few times.
At this point you can stop and have a very nice simple flower from one piece of paper. Or, if youre looking for something a little more, continue on:
Repeat steps 1-3 with your remaining pieces of paper, using a different cut on each.
Step Four:
Stack your paper flowers on top of each other and glue all the layers together. Use small dabs of glue precisely placed with a toothpick, not sloppy globs. Firmly press the pieces together with your fingers to help the glue bind. Alternatively, you can use a piece of craft wire to string them together, making a stamen out of the wire ends.
About
 contact Sparrow:
• legal info
contact Sparrow:
• legal info
![]()
home • antifesto • this issue • archive • submit • errata • masthead • contact us • legal