

 |
Beltane 2008 |
 |
 |
 |
pomme et porc > speckschnittenlebkuchenhaus > pork princess >
vegan wrapped in bacon > surprise #1: filet de bling >
surprise #2: bleary morning

Rebecca Garcia (photo)
click image to enlarge
Ever get so tired of hearing someone (and for each of us, there's always a Particular Someone) sigh meaningfully at you and demand, ever so patiently and condescendingly, "Would you please stop playing with your food?" that you simply MUST play with your food?
This is the bracelet that lets you do just that. It invites others to play along with you. And with any luck, it will also shock the very person you have so recently and inordinately vexed with your mealtime recreation. If you're very lucky, it'll happen in public, perhaps over club sandwiches. Better yet: over that tasty bacon-wrapped steak concoction... what's it called again?
Suggested Watching
Alice (1976-1985); Mel shall be your cranky Buddha, "Kiss my grits" shall be your mantra.
Difficulty
Boy Scout Dropout
Click here for definitions of difficulty levels.
Finished Measurements
Your bacon, just like bacon in the pan, is freeform. The size will vary depending upon the measurement of your own wrist diameter and the design of your bacon. Mine was 9" (22.8cm) x 2.5" (6.3cm) at its widest point.
Materials
- Clover Natural Wool Roving, black
- Clover Natural Wool Roving, brown
- Clover Natural Wool Roving, gold
- Clover Natural Wool Roving, off-white
- Clover Natural Wool Roving, rust
- Craft felt in a neutral color (sample uses off-white)
- Felting needle tool fitted with standard size needles
- One (1) heavyweight felting needle
- Thick, spongy surface for needle felting (see Design Notes)
- Hook and loop tape, about half an inch (1cm) or a small circle
- Sewing needle
- Sewing thread in a basic cooked bacon color, your choice
- Measuring tape
- Permanent marker
Design Notes
This is a dry felting technique and takes very little wool. I bought small packages of wool, each one weighing 0.7 oz (20g), and after making two bacon bracelets, it seems like I barely touched the stuff, considering what's left!
The "thick, spongy surface" is partly for protection of your nice furniture/countertops/legs/anything you don't want painfully and permanently perforated by the needles. It's also to give you something, while felting, that has give' and a bit of bounce while you repeatedly poke at the thing to be felted. Important details to have are a substance that's deeper than the needles can punch (to protect the needle tips) and won't fall apart or embed itself into the project during the course of felting. Look for a dense brush; thick, a dense piece of upholstery pad; or (last resort only) many multiple layers of the very densest possible batting. Don't use a quilt or comforter unless you want a hole in the fabric—or, equally likely, to join this project to that fabric!
Felting needles have special barbs on the sides to grab fibers. The result is intermeshing of either layers of fabrics or layers of fibers or layers of fibers and fabrics. These needles come in a small variety of weights, and can be worked as either a single tool (one needle in the hand) or by inserting several needles in a needle-felting tool.
Please don't miss the felt and poke your fingers! It hurts like no other needle I've stuck in my finger—it's more like being stuck by a fishhook, but easier to remove. Unlike other needle-puncture injuries, it didn't hurt much past that first day. Otherwise, it's quite safe.
You probably don't want to leave this project (in any state of incompletion) or the tools where a toddler can easily grab it. It's not a project for unattended children or even a large swarm of over-sugared, birthday-partied 7-year-olds, regardless of how keen it might sound to the clump of self-medicating adults chaperoning from the safe distance of the family room's wet bar.
Base:
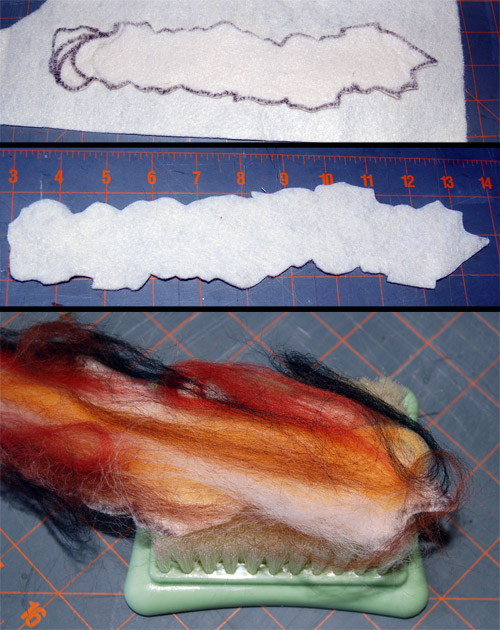
Cutting out the base and arranging the roving.
Rebecca Garcia (photo)
click image to enlarge
Measure your wrist and add at least 2 inches (5cm) to the length. For example: the diameter of my wrist is 7" (17.7cm), so: 9" (22.8cm). Draw the outline of a piece of bacon on your craft felt with the permanent marker. Don't worry about making a mistake! This is just a base for your felted wool. It will all be covered completely—no one will see the lines.
Cut out the craft felt bacon base. Start arranging wool roving on the surface in a way that makes you think of cooked bacon: some parts will be long, narrow areas of creamy fat, some will be thick, wide meaty chunks. Add a bit of burn along some of the edge. In fact, get a couple of pieces of bacon, take a look at a cooking magazine, or pull up some images from the Internet for direct inspiration. You really want your felt bacon to be as realistic as possible, so look at the Real Thing.
Needlefelting:
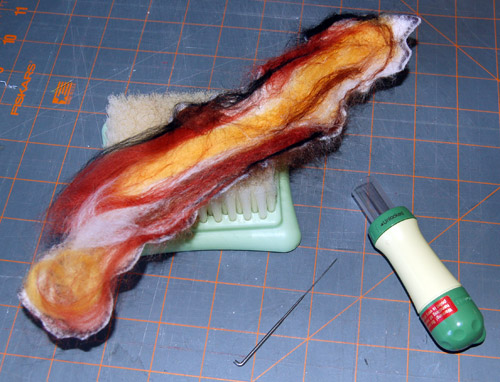
Preparing to needlefelt.
Rebecca Garcia (photo)
click image to enlarge
Begin felting along the outside edge using the single heavy-duty needle. You will be amazed how quickly you will see results. At first, you'll be able to move the fibers around a little to suit your design. Once they are locked in place, however, the only way to change the design is to add more layers. While that's not terrible, you don't want this to get too thick. It's already designed to be thick-cut bacon.
Switch over to the needle-felting tool to work larger areas. Once all of your fibers are basically locked in place—but not finished—stop and take a look at your work. Does it look like bacon to you? Really? Is there enough contrast? Is it marble-y enough? And as long as you're stopped, take a look at the reverse. Notice that you don't need to do anything! The design that happens on the front gets poked through to the back, too. It's just a bit furrier looking. Just keep working on the front. The furriness will mostly work itself out, but if it's still intolerable when you're done, you can always run some clippers along the back.

Using the single needle.
Rebecca Garcia (photo)
click image to enlarge
As you work on the design, comparing your felt bacon to real bacon, feel free to go back and forth between using the single heavy-weight needle and the needle felting tool. It's helpful to have the different types of control each tool gives. In my experience, I like to start with the single needle to "anchor" the details in, then switch to the multiple-needle tool for over-all pattern working, and then to return to the single needle for spot details. There are as many ways to work with needle felting as there are needles. It's reasonably forgiving, as well as a speedy method to make small works of felt.
Finishing:
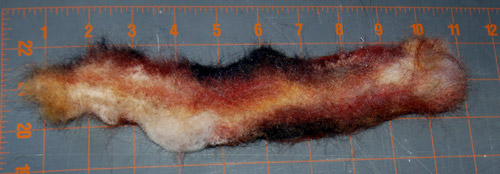
Reverse side.
Rebecca Garcia (photo)
click image to enlarge
Once your front is finished, wrap it around your wrist to determine where you would like to place the hook and loop tape. Sew it to the bacon bracelet, even if it is the iron-on or self-adhesive type: wool finds those attachment methods feeble, and will slip off your wrist at the first opportunity. Of course, you can forego the velcro completely, and attach ribbon instead. Bacon and bows: lovely. Accessorize with a pearl ring.
Wear this and enjoy the "(gasp) Is that BACON? But I would NEVER put that piece in my mouth!! Still that's pretty cool. Can I touch it?" reactions you'll inevitably get.
About
contact Rebecca:
• http://photogramcrackersandmilk.blogspot.com/ • legal info
![]()
home • antifesto • archive • errata • masthead • angstylvania • legal