

 |
Beltane 2009 |
 |
 |
 |
piece of pisces > neko manko chan > classique > be prepared >
what are you looking at? > little mary merkin > supurbia > mo' hair >
mer(maid)kin > fly fishing > dentata > high drama
Ralleyn Hatter (photo)
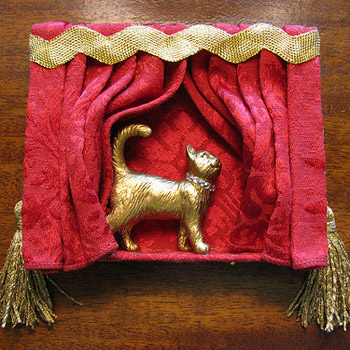
Turn any boring evening into a night of burlesque performance art with your very own stage.
Suggested Reading
Gay Purr-ee (1962, rated G)
Difficulty
Boy Scout Burnout
Click here for definitions of difficulty levels.
Finished Measurements
5"/12.7cm W x 4"/10.2cm H x 1"/2.5cm D
Download
High Drama Curtain Help (pdf format)
Materials

Raellyn Hatter (photo)
click image to enlarge
- Ruler
- Iron
- Chipboard
- Damask fabric
- Gold rickrack trim
- 2 gold tassels
- Thread
- Jumprings
- Fabri-tac glue
- Heat n' Bond Iron on Adhesive
- Small ironing board or towel
- Sewing pins
- Craft felt
- Sewing needle
- Cutting mat
- Small craft punch
- 2 gold eyelets
- Eyelet setter
- Craft hammer
- Small plastic cat
- Burnt umber acrylic paint
- 2 small flat paintbrushes
- Rub n' Buff gold leaf
- Small soft cloth
- Small flat-back rhinestones
Design Notes

Raellyn Hatter (photo)
click image to enlarge
To get the look of richly figured jacquard stage curtains, I used a damask table napkin which can be found in most home decor stores. One napkin provides more than enough fabric for this project, and the rolled edge provides a perfect no-sew hem for the bottom of the curtains.
Create the Stage:
Raellyn Hatter (photo)
click image to enlarge
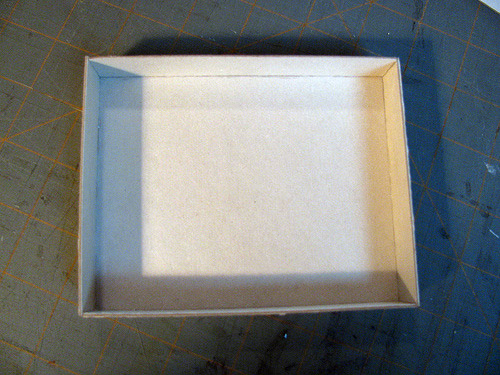
Measure and cut from the chipboard five pieces: 1 (one) 5" W x 4" H (12.7cm x 10cm), 2 (two) 5" H x 3/4" W (12.7cm x 1.9cm), and 2 (two) 4" H x 3/4" W (10cm x 1.9cm). Cut extras if you think you may need them. Glue them together with the Fabri-tac glue to create an open-faced box that will become your stage.
From your fabric napkin, cut three pieces: one 10"/W x 11"H (25.4cm x 28cm) and two 8"W x 5.5" H (20.3cm x 14cm). Cut the two curtain pieces so that the longest edge includes the rolled hem of the napkin so you don't have to create one later.
Cut six pieces from the Heat n' Bond that measure 1/2" W x 5" H (1.25 x 12.7cm). Set aside two of the pieces until after you iron the pleats in the curtain fabric. Create hems on the short edges of the curtain pieces by ironing a strip of Heat n' Bond adhesive onto each short edge and then folding them over and ironing again to create a smooth edge.

Raellyn Hatter (photo)
click image to enlarge
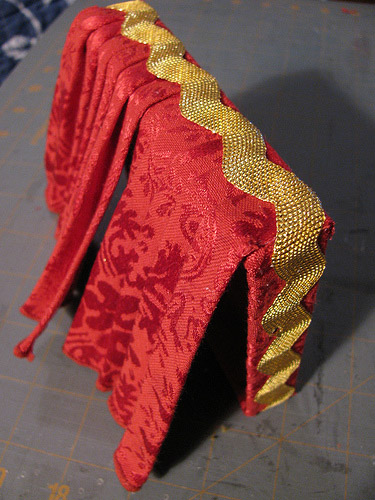
Now you are ready to pleat your curtains. I used knife pleats on this project because it allows the fabric to hang relatively straight and flat, while appearing to replicate the deep folds of a stage curtain. Knife pleating fabric is not a difficult thing, it just takes time and a little patience to make the folds do your bidding. I recommend working with one piece at a time and using the sewing pins to hold each pleat in place until you are ready to steam it into submission.
Lay your curtain panels on your ironing board or towel and heat up your iron. Starting 1" (2.54cm) from an end, fold the fabric to make a pleat half that wide. Stick a pin through each end of the pleat and into the ironing surface to hold it still until you are finished. Continue to fold the fabric in that fashion until you have six even pleats that do not overlap each other. (See the pleating diagram.)
Repeat this process with the other curtain piece, making sure to mirror the first panel. This will ensure that the curtains will match symmetrically and draw back evenly when their cords are pulled.
While the pins are still in the pleated panels, use a hot steam iron to set the pleats. Press firmly down the center until you feel you can safely take out the pins and press the edges of the panels. Now use the last two pieces of Heat n' Bond adhesive and iron one across the top edge of each pleated curtain where the fabric is unhemmed. Do not remove the paper backing from the strips. This will help them keep their shape until you are ready to attach them to the stage. When the panels are fully pleated and pressed, set them aside to cool under a heavy weight, like a book, to insure that the pleats do not relax while you are upholstering the interior of the stage.

Raellyn Hatter (photo)
click image to enlarge
Using the Fabri-tac glue, cover the interior of your stage, and line it with the remaining piece of fabric that you cut. Ease the fabric into the corners and cut away any excess fabric to reduce bulk while maintaining adequate coverage. Set this aside for a moment to let the glue set up, then glue down the remaining fabric over the outside and around the back of the box. Trim away any excess to reduce bulkiness on the backside.
Trim any stray threads away from the top of the curtains' unhemmed edges. Use the Fabri-tac glue on top edge of the curtain to attach the curtains to the top of your stage. Overlap the curtains in the center slightly to ensure that there are no gaps in your finished curtain. Hold the curtains in place until the glue is set.
Raellyn Hatter (photo)
click image to enlarge
Cut a piece of the gold rickrack trim to fit snugly around the outside of the stage. Glue it into place, covering the cut ends of the curtains and overlapping the cut ends at the bottom where they will not show. Cut another piece of gold rickrack trim that will fit around the front and sides at the top, wrapping around to the backside. Glue this piece into place, making sure it adheres well to the curtains in front.
Next, punch a small hole for the eyelet with your craft punch approximately two-thirds of the way up each side of the stage. Your tassels will be threaded through here to enable you to draw the curtains back on your stage. Set a gold eyelet in each of the holes with the eyelet setter and craft hammer for a finished look.
Raellyn Hatter (photo)
click image to enlarge
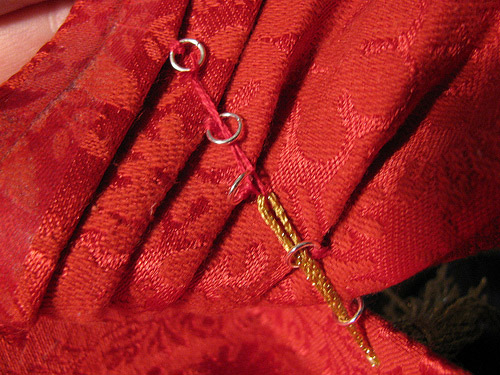
Follow the sewing guide for each curtain, sew one small jump ring to the edge of each fold using your needle and matching thread. Thread the tassles in from the outside and through each of the jump rings, and attach with thread to the last jump ring. If your tassle cord is not long enough to allow the curtains to fall smoothly, just extend it wth some thread.
Cut the felt for the backing so it measures 4.75" W x 3.75" H (12cm x 9.5cm). If you will be adding jump rings to the corners to facilitate wearing the merkin, sew those on now with matching thread. Stitch them securely to the upper corners of the merkin at a couple of points on each ring. Apply the Fabri-tac glue to the back of the felt, and press it into position on the back of the merkin to provide a smooth surface that conceals all the messy fabric edges.
Gild Your Pussy:
Raellyn Hatter (photo)
click image to enlarge
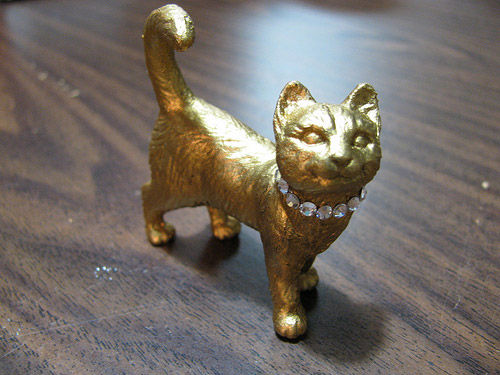
Coat the plastic cat figurine completely with the burnt umber acrylic paint and let dry completely. Use the other paintbrush to apply the Rub n' Buff gold leaf and let dry for a few minutes. Rub the cat figurine with the soft cloth to buff the gilding to a shine. If any areas need to be recoated, repeat the process until the figurine is completely gilded. Let dry for at least 20 minutes after the final buffing. Use the Fabri-tac glue to adhere the small flat-backed crystals around the cat's neck to form its jeweled collar.
Assembly:

Raellyn Hatter (photo)
click image to enlarge
Adhere the gilded kitty to the stage with the Fabri-tac glue. Position it so it will been seen perfectly when the stage curtains are drawn back. Your shiny pussy is center stage now and is clamoring for attention!
About
 contact Raellyn:
• legal info
contact Raellyn:
• legal info
![]()
home • antifesto • archive • errata • masthead • angstylvania • legal