

 |
Beltane 2009 |
 |
 |
 |
piece of pisces > neko manko chan > classique > be prepared >
what are you looking at? > little mary merkin > supurbia > mo' hair >
mer(maid)kin > fly fishing > dentata > high drama
Mama Cat (photo)
Anthony Ascione (model)
Need some more hair down there? Want a softer patch? How about a brighter one?
Suggested Reading
Crazy Hair
by Neil Gaiman
Difficulty
Boy Scout Princess
Click here for definitions of difficulty levels.
Finished Measurements
Approximately 6"/15.2cm W at widest point and 3.75"/9.5cm H, depending on how long a time and how densely you full the finished knit object.
Materials
- Worsted weight yarn (yarn used - Cascade Yarns The Heathers 220, Color 9408)
- Dyed mohair locks
- US 8/5mm knitting needles
- Fine tooth comb
- Scissors
- Felting needles
- Felting pad
Gauge
Not necessary when you can control how small the item becomes.
Design Notes
In this project, you will be using two different (but related) methods of interlocking protein fiber to create a denser material which appears fused together.
"Fulling" is the term used for "felting" finished cloth, whether it is woven, knitted, crocheted, etc. This can be done by hand (which is traditional) or by washing machine (if carefully monitored so the process doesn't go too far for your purposes) with hot, slightly soapy water. The fabric will shrink as the individual fibers lock together.
"Felting" is a more general term, and is accepted to describe all fabric/fiber transformations in which fibers are shocked into fusing together. The application of heat (wet or dry) and aggitation is the most common means of felting. Fibers can be "dry felted" using barbed needles and repeatedly poking the needles through the materials to be joined. Felting needles come either singly or in sets, often secured in a special needle holding tool; there are also machines resembling sewing machines fitted with multiple needles which will needle felt fabrics and fibers even more quickly. In the needle-felting method, there is less shrinkage, though the resulting fabric becomes more dense.
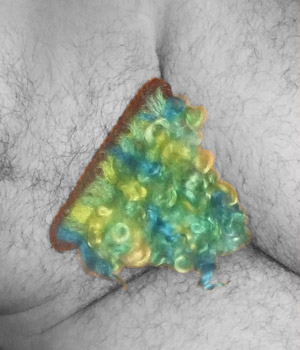
In this project, you will be fulling a triangular cloth you will knit, and then needle-felting locks of mohair onto the fulled, knit triangle.
Be sure to use 100% wool that is NOT superwash or your fiber may not felt.
Don't forget that felting needles are barbed and therefore it hurts like a sonuvabitch if you stab yourself.
Knit the Base:
CO 31.
Row 1: sl 1, then p all the way across.
Row 2: sl 1, then k all the way across.
Row 3: sl 1, then p all the way across.
These three rows set up the decrease, so the finished object is a triangle. Continue by alternating the next two rows:
All Following Even Rows: sl 1, ssk, k until 3 st on left needle, k2tog, k
All Following Odd Rows: sl 1, p across
Repeat Even and Odd rows, ending with an Odd row, until 7 sts remain. Bind off.
Full (optional) and Block the Base:
Full slightly, if desired. Block flat. Finished size should be approximately 6"/15.2cm W at triangle top and 3.75"/9.5cm H, or whatever size you decide upon during fulling.
Prepare Your Locks:
Hold a mohair lock up with your fingers by the cut end. This end will be refered to as the "top of the lock." The "bottom of the lock" refers to the curl that hangs down and ends in a bit of a point.
Open up the cut end of the mohair lock by gently combing the topmost 1-1.5"/2.5-3.7cm with the fine-toothed comb. If the lock is over 3 inches, trim it off the top to that length (or the length you desire). If you want the nice little curls, do not open the bottom of the lock. Just like human curly hair, this will cause it to frizz. If you want frizz, then by all means go for it.
Needlefelt the Locks to the Base:
1. Place your felting pad on a sturdy surface, such as a table or the floor but NOT your knee.
2. Put your base on the felting pad.
3. Starting at the bottom of your base (the tip of the triangle), take a mohair lock and place the last .75"/2cm of the top of the lock on the base and poke repeatedly with the felting needle(s) until the ends are secure.
4. Pull the base away from the felting pad to prevent it from felting TO the pad.
5. Repeat from step 3, overlapping the rows of locks like fish scales.
If you want a thicker pelt, overlap them alot. If you want a thinner one, don't overlap them at all.
Continue adding rows of locks until you reach the top. Fill in as much as you want.
Finishing:
Turn the merkin over and trim the stray fibers on the back. Don't trim too close or the locks might come loose. Pet your merkin. Isn't it so soft?
If you have enough worsted weight scrap yarn, knit some i-cord and attach it to the base to create a g-string-esque adornment (the bottom of the triangle could be continued if you wanted to really turn this into a g-string), or just attach with spirit gum.
About
 contact Holly:
• legal info
contact Holly:
• legal info
![]()
home • antifesto • archive • errata • masthead • angstylvania • legal