

 |
 |
 |
 |
 |
 |
 |
 |
vegan coconut pie pie > beanis > petticoat for the ages
Zabet Stewart (photo)
Renée Rigdon (model
"May the nipple always serve you."
-Bitch and Animal
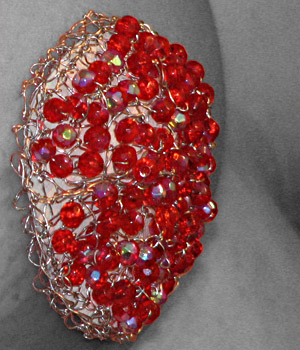
What can I say about these? They are knitted wire beaded pasties. They are sparkly. They are like a party for your boobs and whoever you care to share your boobs with. They are, according to Renée, "surprisingly comfortable." So what's stopping you?
Suggested Listening
"Sparkly Queen Areola"
Eternally Hard
by Bitch and Animal
Difficulty
Strong Intermediate
Click here for definitions of difficulty levels.
Finished Measurements
2" in diameter
Materials
- 1 pair US 2 (2.75mm) bamboo or wooden needles
- 1 US 3 (3.25mm) bamboo or wooden needle
- 1 US F (3.75mm) crochet hook
- 28 gauge craft wire, silver
- 180 beads, no larger than 4mm (90 beads each)
- scraps of vinyl cloth (that is flocked on the wrong side) for lining in a color that matches your skin tone or a high-contrast color
- compass (for drawing circles, not one that points North)
- scissors
- 3M 77 Spray Adhesive
- eyelash glue
Gauge
20 sts = 2.5" flat
Project Notes
This pattern is knit flat with short rows. You do not need to wrap short rows when working with wire, simply turn the work and begin the next row.
If you have never knitted with wire before, check out Down to the Wire for technique tips.
If you find you enjoy working with wire, The AntiCraft has two other wire projects you might want to check out: Heart Shaped Box and Excruciatingly Painful Party Lights.
Directions
Before You Start
Pre-string any beads you want to use onto the wire before casting on. Remember to add them ONLY on WS rows. Usually I don't recommend putting beads on the first and last stitch of a row because it looks messy, but in this project it's OK to put them on the first stitch because of the way the piece is constructed. The last stitch of every WS row will not have a bead.
Pasties (make two):
Leaving yourself short (1-2") tail, use backward-loop method to cast on 5 sts onto size US 3 needle. Remember to give the first stitch an extra twist before casting on other stitches.
Move sts to size US 2 needle.
Knit 6 repeats of the following sequence:
Row 1: K 5 sts
Row 2: K 5 sts, adding a bead BEFORE each st except the last
Row 3: K 4 sts, turn
Row 4: K 4 sts, adding a bead BEFORE each st except the last
Row 5: K 3 sts, turn
Row 6: K 3 sts, adding a bead BEFORE each st except the last
Row 7: K 2 sts, turn
Row 8: K 2 sts, adding a bead BEFORE each st except the last
Row 9: K 3 sts, turn
Row 10: K 3 sts, adding a bead BEFORE each st except the last
Row 11: K 4 sts, turn
Row 12: K 4 sts, adding a bead BEFORE each st except the last
After finishing the 6th repeat, bind off loosely (you may want to use the size US 3 needle again). Cut wire and leave a tail 24". Your piece will naturally curl around to form a circle. Take the long tail and run it through the sts at the center of the circle and pull tight. Whipstitch up to join the top end to the bottom end, giving you a real, though slightly conical, circle. Pull wire tight.
Using the crochet hook and long tail, slip stitch once around
the outside of the pasty. (Pastie? What's the singular?) Cut tail shorter, and weave/tuck in the both ends. Don't worry about tucking too carefully, as any pokey bits will be taken care of in the Finishing.
Work with any beads that seem out of place to get them in line. Sometimes you can even rotate a bead to twist the wire behind it to get the bead to behave.
Finishing:
Use your mad geometry skillz to draw four 2" circles on the vinyl cloth with your compass. Cut out the circles carefully. Read the directions on the spray adhesive before using and follow the outlined safety measures! Spray the flocked side of each circle with a quick spritz of the 3M 77. Place two circles together to form a vinyl-and-flock sandwich cookie (where the flock is the the cream filling). Repeat with the remaining two circles.

Inside of the Pasty
(radius cut and overlapped area of "cookie" easy to see)
click image to enlarge
Using the small hole left in the center of the fabric from the point of the compass as a guide, cut a straight line along the radius of the fabric cookie. This will let you force the cookie into a slightly conical shape by allowing the fabric to overlap upon itself. Do this to both cookies.
Give one side of a cookie a liberal spray of 3M 77. Push the sticky side of the cookie into the inside (concave side) of the pasty. Form cookie to shape of pasty. It should be slightly smaller than the pasty to avoid having fabric overhang. Hold firmly for 1 minute and let dry thoroughly according to adhesive directions. Repeat for second pasty.
Wearing:
Apply eyelash glue liberally to inside of pasties. Press into place and hold for 30 seconds to a minute. Let dry according to directions. Voila! You are now the Sparkly Queen Areola!
About
![]()
home • antifesto • this issue • archive • submit • errata • masthead • contact us • legal