
 |
 |
 |
 |
 |
 |
 |
 |
los pequeñeos relojes de arena > mmm... brains.... > calabaza tallada >
conmemoración > calacas de arcilla > huesos deliciosos >
las calacas danzantes > sweet satisfaction > calavera charts >
magdalenas de muertos > he sees you when you're sleeping

Sabrina Thompson (photo)
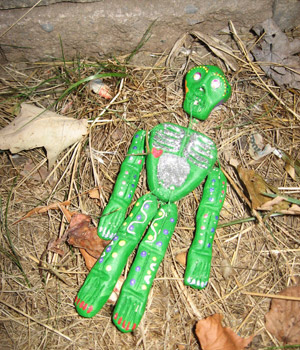
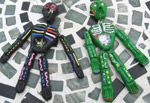
This project is a huge hit for all ages at my pumpkin carving parties. I make the skeleton components the day before the party, and provide thread for their assembly, and paint, glitter, glue, and craft eyes for their decoration. For further embellishment, my friends take them home and add hair or cardboard-cut-out guitars.
Suggested Watching
Day Of The Dead (1985, unrated)
If you want to make a vintage gore-fest of your evening, check out the first two George Romero zombie classics in the trilogy, Night Of The Living Dead (1968, unrated); and Dawn Of The Dead (1978, rated R). You’ll have time to watch all three, the clay takes some time to dry.
Difficulty
Bob Ross Wannabe
Click here for definitions of difficulty levels.
Finished Measurements
Approximately 7"H/18cm x 3"/7.5cm W; size may vary, see Design Notes.
Materials (makes 1 skeleton; multiply as needed)
- 3 oz/90g of air drying clay (not polymer clay)
- Sewing thread or dental floss (see Design Notes)
- Toothpicks
- Acrylic craft paint
- Paintbrushes
- Glitter (optional)
- Craft eyes (optional)
- Glue (optional, for glitter and eyes)
- Other embellishments conjured by your surprising subconscious (optional, which may require glue or forensic expert)
Design Notes
Some air-drying clays are heavier than others. The size of your skeleton may vary a bit due to differences of volume per weight of material, depending on the type or brand of air-drying clay you buy. This will affect the string you choose, too.
The string is for tying the ‘"bones" together, and can be a variety of materials on hand. Whatever you have that will fit through the holes you make will be fine: sewing thread, dental floss, wire, embroidery floss, fine ribbon, etc.
In a hurry? This project takes about 20 minutes to make skeleton components, plus at least 12 hours drying time for clay, plus the time you choose to invest in decorating the assembled skelly afterwards. Plan accordingly.
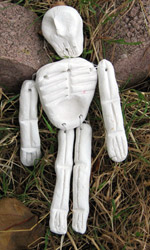
Divide your clay into 6 pieces: one each for the skull and torso, and 2 arms and 2 legs.
Mold a three-dimensional skull sizing approx 1.5"/3.75cm long and 1"/2.5cm wide. Press indentations for eyes, pinch to form a bit of a nose between the eyes, and scribe the teeth with a toothpick.
Make the torso with measurements 2"/5cm tall and 2"5cm wide at the shoulders. Flatten it a bit and form it into a sort of rounded-triangle towards the pelvic area. Indent the stomach cavity with your thumb, and use the toothpick to carve the ribs.
The arms and legs are made the same way, all approximately 3"/7.6cm long, 0.5"/1.2cm wide. Press a line down the middle with the toothpick to represent the arm bones, and two horizontal lines at the elbow and wrist, or knee and ankle accordingly. Form fingers and toes by pressing the toothpick accordingly to divide.
Then, pierce holes accordingly: one at the top of each leg and arm, two at the pelvic area of the torso, and one at each shoulder. Make sure each hole is far enough away from the edge! Pierce a fifth hole at the neck of the torso to attach skull to the body, and the last one through the center of the teeth of the skull.
Allow the clay to dry completely. Depending on your brand, this may take 12 hours; it may be more or less. Refer to your package for specifications.
Once all parts are fully dry, use thread or dental floss to assemble your skeleton. Make sure the knots are tight enough to hold the pieces together, but loose enough to let them dangle freely.
Fully assembled skeletons can be painted, glittered, and decorated whatever way you wish.
Here are some sites for inspiration:
http://www.ddfolkart.com
http://www.casamexicanafolkart.com/the_day_of_the
_dead.html
http://www.diadelosmuertos.us
About
 contact Sabrina:
• legal info
![]()
home • antifesto • this issue • archive • submit • errata • masthead • contact us • legal

