
 |
 |
 |
 |
 |
 |
 |
 |
los pequeñeos relojes de arena > mmm... brains.... > calabaza tallada >
conmemoración > calacas de arcilla > huesos deliciosos >
las calacas danzantes > sweet satisfaction > calavera charts >
magdalenas de muertos > he sees you when you're sleeping

Stevie Savage/Raid Zero (photo)
Joeli Caparco (knitter)
Jennifer Gwiazdowski (model)
click to enlarge
The title of this project means Little Clocks of Sand, referring to the emblematic hourglass, one of Death's many symbols that allude to the passage of time and man's mortality. The symbol for infinity borrows this image, too, and is a little hourglass on its side.
Suggested Reading
Mort by Terry Pratchett
Difficulty
Strong Intermediate
Click here for definitions of difficulty levels.
Finished Measurements
These are measurements of the person, not of the sock. Remember, the sock stretches. Length varies; check Materials notes.
| To Fit Adult Size | Calf Measurement | Ankle Measurement |
| S | 14"/35.5cm | 8"/20.3cm |
| M | 15"/38.1cm | 8.5"/21.6cm |
| L | 16"/40.6cm | 9"/22.9cm |
| XL | 17"/43.1cm | 9.25"/23.5cm |
| XXL | 18"/45.7cm | 9.5"/24.1cm |
Materials

Stevie Savage/Raid Zero (photo)
Erssie Major (knitter)
Jennifer Gwiazdowski (model)
click image to enlarge
- Pink Knee Socks
- Lorna’s Laces Shepherd Sock [80% superwash wool, 20% nylon; 215yd/197m per 2oz/56g skein] Pink Blossom, 2 sk
(this should be enough for below the knee socks in smaller sizes, or mid calf socks in larger sizes)
- Lorna’s Laces Shepherd Sock [80% superwash wool, 20% nylon; 215yd/197m per 2oz/56g skein] Pink Blossom, 2 sk
- Neon (Variegated) Calf Socks
- Opal Neon [75% superwash wool, 25% polyamide; 464yd/425m per 3.5oz/100g skein] NE 1933, 1 sk
(this should be enough for mid-calf socks in smaller sizes, or ankle socks in the larger sizes)
- Opal Neon [75% superwash wool, 25% polyamide; 464yd/425m per 3.5oz/100g skein] NE 1933, 1 sk
- US 1/2.25mm knitting needles, your choice of:
- either dpns, set of 5
- or one long circular (40"/100cm" or longer)
- or two short circulars (24"/60cm or 32"/80cm)
- US 3/3.25 mm knitting needles (to cast off only)
- 1 stitch marker
- Tapestry needle
- Some waste yarn, preferably a slightly thicker gauge than the main yarn
- Sharp embroidery scissors if cutting off waste yarn
Gauge
28 sts and 32 rows per 4"/10cm in stocking stitch using US 1/2.25mm needles or size needed to obtain this gauge. It is worth mentioning that I tend to knit in a fairly relaxed way, hence my gauge is on the loose side, so do take care to choose a needle size that gives you the gauge given for stocking stitch.
Design Notes
Both pairs of these socks were knitted in a wool sock yarn in little hourglass ribbing and just like an hourglass, we kept going until it ran out (the yarn, not the sand) as these are toe up socks. So for the Opal Neon (variegated) pair, this is just below the calf and for the Lorna's Laces version the yarn finished generously below the knee. The theme coupled with the bright festive shades in these ranges is in keeping with the colourful balance of life and death celebrated on Día de Muertos.
The toe starts with a provisional cast on, and for those of you who hate to fiddle about with a crochet hook, don't despair, try the second method suggested under Special Stitches (it works for me).
The socks cover a wide range of sizes and can be used for men or women (to be worn with or without heels!)
This pattern uses the terms Yarn Forward (yfwd) and Stocking Stitch, which are the British equivalents of Yarn Over (yo) and Stockinette Stitch in US terminology.
Special thanks to Joeli Caparco for knitting the pink knee sock version.
Special Stitches

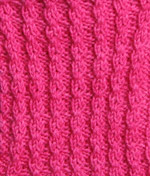
Little Hour Glass Ribbing
Stevie Savage/Raid Zero (photo)
Joeli Caparco (knitter)
click image to enlarge
Little Hour Glass Ribbing (in the round multiples of 4 sts):
Rnd 1: *K2, p2,* repeat from * to * around.
Rnd 2: *K2tog tbl without removing them from left needle, then k the same 2 sts tog tfl, p2,* repeat from * to * around.
Rnd 3: *K1, yfwd, k1, p2,* repeat from * to * around (increases total stitch number temporarily).
Rnd 4: *Wyib sl 1 p-wise, k1, psso, k1, p2,* repeat from * to * around (stitch number returns to normal).
Click here to view a video tute for Little Hourglass Ribbing.
Provisional Cast On Method 1
Step 1: Using waste yarn slightly thicker than the sock yarn and a crochet hook crochet a chain of ~40 sts.
Step 2: Using the 2.25 mm (US 1) needles and main sock yarn, pick up the number of stitches you are asked to CO in the Toe section through the very bottom loop of the chains.
Step 3: Tie a knot in the end of the waste yarn at that end (to be undone later).
Step 4: Proceed with short row toe.
Step 5: To pick up sts later, undo crochet chain and pull out sts slowly one by one and pick up on the needle (this way round, you sometimes get one less stitch then you cast on, so pick up one extra st at one end if necessary).
Provisional Cast On Method 2
Step 1: Using waste yarn and 2.25 mm (US 1) needles or needles to obtain gauge, CO number of sts instructed and knit a few rows.
Step 2: Change to main sock yarn and proceed with short row toe.
Step 3: To pick up sts later insert needle into loops of the first row of main sock yarn after the waste yarn sts. This is much easier to do with a flexible circular. Instead of pulling out waste yarn like the crochet method (which some people hate, because they are worried about losing sts), using sharp embroidery scissors, carefully cut off waste yarn leaving the sts picked up live and ready to use.
Short Rows: Wrapping Stitches (w&t)—RS
Step 1: Work as instructed to stitch to be wrapped.
Step 2: Bring yarn forward between the needles.
Step 3: Slip st to be wrapped from LH needle to RH needle purl-wise.
Step 4: Take yarn back between needles again so it is behind your work.
Step 5: Slip stitch previously slipped back onto LH needle purl-wise.
Step 6: Turn.
The stitch is now wrapped and you can work the WS.
Short Rows: Wrapping Stitches (w&t)—WS
Step 1: Bring yarn back between the needles so it is behind your work (i.e. on the RS).
Step 2: Slip st to be wrapped from LH needle to RH needle purl-wise.
Step 3: Bring yarn forward again between needles (to WS again).
Step 4: Slip stitch previously slipped back onto LH needle purl wise.
Step 5: Turn.
The stitch is now wrapped and you can work the RS.
Short Rows: Picking up wraps—Double wrapping method for these socks on RS
Step 1: Knit to first wrapped stitch.
Step 2: Slip stitch purl-wise to RH needle.
Step 3: Using LH needle underneath the wrap pick it up and leave on LH needle.
Step 4: Slip stitch previously slipped, back onto LH needle.
Step 5: Knit wrap previously picked up and stitch slipped together.
Step 6: Wrap next wrapped st (this will now have two wraps) and turn.
Short Rows: Picking up wraps—Double wrapping method for these socks on WS
Step 1: Purl to first wrapped stitch.
Step 2: Slip stitch purl-wise to RH needle.
Step 3: Using LH needle underneath the wrap pick it up and leave on LH needle.
Step 4: Slip stitch previously slipped back onto LH needle.
Step 5: Purl wrap previously picked up and stitch slipped together through the front loops (this mirrors how you worked it on the RS).
Step 6: Wrap next wrapped st (this will now have two wraps) and turn.
For the double wrapping method both RS and WS, you will now need to work to first st wrapped twice, and pick up both wraps together and knit with the stitch in the same way as you worked the first wrapped stitches above.
Stretchy Rib Cast Off
There are many methods of a flexible rib cast off, this is just one.
Step 1: With first two sts to cast off, *k2tog tbl.
Step 1: Slip stitch just worked from RH needle to LH needle again, and rpt from * until all stitches are cast off.
Toe:
Using waste yarn and preferred method of provisional cast on, CO 30 (32, 34, 36, 38) sts [for size S (M, L, XL, XXL)] in main yarn using US 1 (2.25mm) dpns/circs or size to obtain gauge.
Knit short row toe in stocking stitch using methods described in Special Stitches and as follows:
Row 1: K to last st (unwrapped), w&t.
Row 2: P to last st (unwrapped), w&t.
Repeat rows 1 and 2, knitting to the last st in the row that is unwrapped, and wrapping it and turning.
Continue until 10 (10, 11, 12, 12) sts are wrapped on each side of toe, and 10 (12, 12, 12, 14) are left unwrapped in the centre of the toe.
Next following instructions pick up wraps as follows:
Row 1: K to first st wrapped, PU wrap and k tog with st, w&t.
Row 2: P to first st wrapped, PU wrap and k tog with st, w&t.
Repeat Rows 1 and 2 until all wrapped stitches have been picked up and knitted.
K across all 30 (32, 34, 36, 38) sts of Heel then pick up 30 (32, 34, 36, 38) sts from provisional cast on (see Special Stitches) and join back into rnd with a total of 60 (64, 68, 72, 76) sts.
K 3 rnds stocking stitch.
Foot:
Prepare for knitting a patterned top of foot and plain stocking stitch bottom of foot:
Divide sts equally between needles/dpns so that there are 30, (32, 34, 36, 38) sts for top, and the same number of sts for the bottom.
Next slip 0 (1, 0, 1, 0) sts at either ends of the top of foot to the bottom, i.e. 30 (30, 34, 34, 38) sts for top of foot (a multiple of 4 sts plus 2 for little hourglass ribbing),
and 30 (34, 34, 38, 38) sts for bottom of foot to be knitted in stocking stitch.
Continue in rounds knitting the Little Hour Glass Ribbing (see Special Stitches) on top of foot sts only, with stocking stitch on the bottom of foot until foot is desired length minus the heel. You can use desired length minus the length of your short row toe, as toe and short row heel are identical, as you will soon see. Be sure to end after a full pattern repeat of the Little Hour Glass Ribbing.
Heel:
Prepare for heel:
Slip 0 (1, 0, 1, 0) sts at either ends of the bottom of foot needles, back onto top of foot needles. There should now be 30 (32, 34, 36, 38) sts on bottom of foot.
Knit a short row heel, in exactly the same way as you knitted the toe (see Toe section).
Leg:
When heel is complete, join back into rnd with front of foot and continue in Little Hour Glass ribbing on all 60 (64, 68, 72, 76) sts.
Continue until sock is desired length, or until yarn runs out, leaving a small amount to knit a cuff.
Cuff:
Change to 1x1 rib (*k1, p1, * repeat from * to * all the way around) and work 8 rnds.
Cast off very loosely on US 3 (3.25 mm) needles or 2 or 3 needle sizes larger than you used to knit the leg OR you can use the stretchy rib cast off (see Special Stitches).
We did both.
Finishing:
Weave in all ends.
Launder in lukewarm water with a mild baby shampoo. Roll in a towel, and gently squeeze to sponge off excess moisture. Leave on a sock blocker, or reshape whilst damp and leave flat to dry away from sunlight or excessive heat.
About
 contact Erssie:
• http://www.erssieknits.com • legal info
![]()
home • antifesto • this issue • archive • submit • errata • masthead • contact us • legal