

 |
 |
 |
 |
 |
 |
 |
 |
los pequeñeos relojes de arena > mmm... brains.... > calabaza tallada >
conmemoración > calacas de arcilla > huesos deliciosos >
las calacas danzantes > sweet satisfaction > calavera charts >
magdalenas de muertos > he sees you when you're sleeping
Rebecca Garcia (photo)
click to enlarge
He knows. He ALWAYS knows.
"No, no. Put that down, that's Soap On A Rope, you don't want that. No. You don't. No. NO! Come away from there. N-No. That's not for you, either. [exasperated, drawn out sigh] PLEASE stop playing hide and seek inside the clothing racks!!! Can you just be patient for five more minutes? Mommy's trying to pick out something nice for Daddy. Maybe you coul—NO!! You have absolutely! no! need! for! cufflinks!"
Much later, in the toy department:
"
well, Mister Man, you can just stop your list right this minute, because I don't think Santa will be bringing you ANYTHING this year. We can't go TWO FEET down this aisle without—PUT THAT BACK RIGHT NOW!!—you pulling something off the shelf and whining. I don't think Santa likes whiners. There aren't enough cookies in the world to make up for this. What do you want with Barbies, anyway??"
Indeed.
NOW would be a good time to start humming, "He sees you when you're sleeping / He knows when you're awake / He knows if you've been bad or good / So be good, for goodness' sake!" Then dangle this charm in front of the whiny, begging child's face.
Or a grown-up's face, for that matter.
In a post-1984/Patriot Act world, Santa's got eyes everywhere.
Suggested Earworm
"I Want a Hippopotamus for Christmas" by Gayla Peevey, 1953
(animation by Chad Hylton, 2007)
Suggested Watching
A Christmas Story (1983, rated PG)
Difficulty
Boy Scout Dropout
Click here for definitions of difficulty levels.
Finished Measurements
Approx 1" in diameter.
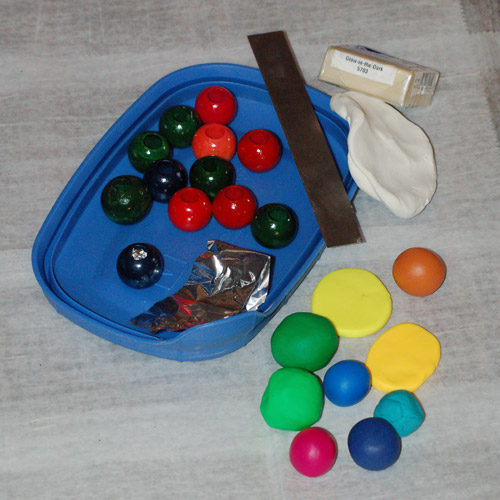
Materials
- Mirror (even just a bathroom mirror you'll see)
- Polymer clay, glow-in-the-dark, 2 oz (56.7g)
- Polymer clay, in a variety of colors (your choice), 3 oz (85g), more or less; scraps are fine for some colors
- Polymer clay, white, 2 oz (56.7g)
- Large wooden beads (approx. eyeball-sized)
- Aluminum foil
- A very smooth work surface
- Rolling pin or pasta machine
- Toaster oven (or aluminum foil, if using regular oven; see Design Notes)
- Tissue blade (see Design Notes)
- Sharp piercing tool
- PVC glue
- Small metal threaded eye bolts (jewelry-sized)
- Faux fur fabric remnants (very small; optional)
- Permanent marker or acrylic paint and brush
- Cord
Design Notes
If you are baking your polymer clay in your regular oven, please do not bake food and poly clay at the same time. Please use "dedicated tools" (tools set aside to be used only with polymer clay). Use aluminum foil to make a tent over the cookie sheet/baking tin that you use for baking the poly clay. This will contain the fumes and particles, keeping them from depositing on the walls of your oven. The danger posed by deposited particles is food contamination the next time (actually, the next several times) you use your oven. Polymers in these clays' are known carcinogens when ingested. This means please also wash your hands after handling them before eating or smoking. It's a good idea to crack a window open while you bake, too. (Not with a brick
aw, you know what I mean.)
Polymer clay is not food safe. Not ever. Not when it's in "clay" form, not even after it's been cured (baked'). It really is important for your health that you label your tools as "polymer clay tools", so you remember. This stuff doesn't wash off completely in the dishwasher or the sink. The residue left behind may not hurt you if you do it only once (but the scientists don't know). But it will definitely cause health problems if you make a habit of it.
You have to condition the clay before you can do anything with it. You condition it by working with it; just knead it like dough for a little bit. This loosens it up and makes it easier to work with. If the clay becomes too loose, wrap it up and put it in the freezer for 10-15 minutes (longer if it's very thick) to restore a little stiffness. It's a good idea to pre-condition all of your clay before starting your project.
Another important tip is to try to work with your colors light color to dark color. The pigments can get on your hands and transfer onto the next color, and you may not notice until you've already started kneading that darker color into your nice, pristine white. If running back and forth to the sink to wash your hands is too much of a bummer for you, keep a damp cloth or some baby wipes nearby and do a quick hand-swipe between colors. It will save you weeping and teeth-gnashing later, trust me. Santa will know, and will be nicer to you. He counts those "special" words you say, you know
A tissue blade, for those who are new to polymer clay, is a special knife that is wide, rectangular, single-edged, and extremely sharp. It is better than a hobby knife for slicing through logs/canes of poly clay because it doesn't distort the shape of the cane or the design within the cane.
This is a cane I adapted from a method I learned from Donna Kato's book, The Art of Polymer Clay, in which she describes her Kaleidoscope Canes. What follows is my vastly simplified method.
Helpful diagram and information on the anatomy of the human eye can be found by clicking here.
We'll be making a cane, perhaps something familiar if you tried the Nazar Boncugu in the Lughnasadh 2008 issue (Mélange). This eye is a far more complex cane, however, with many more steps than a traditional bull's eye cane. Take a deep breath, and plunge in!! You can totally do this.
First thing, though, you'll want to look at your own eye. In your mirror, look closely at your iris. That's the part of the eye that's got all those dazzling colors. There are slivers of multiple colors in there. It's amazing: so easy to get lost in there!! No wonder you've got so many minions under your thrall. Consider these colors when you consider how you want your iris to look. Or, toss those colors right out the window and go for a color scheme that's wild and psychedelic!! We're making Santa eyes. Who KNOWS what his eyes look like? He's an elf, right? A jolly elf! Or not
Rebecca Garcia (photo)
click image to enlarge
Pick up a wooden bead and a small amount of aluminum foil. Use the foil to fill the hole in the bead. The bead is the foundation for your eyeball. This wooden core keeps you from having too thick of a poly clay object to bake. It would take forever to bake a 1" (2.5cm) sphere! This wooden foundation not only minimizes the baking time, it keeps the charm lighter, too. You'll be grateful for this after 17 straight hours of slogging through the desolate pits of hell we call shopping malls. And the whole point of this object is that you wear it while shopping to ward off the persistent and ubiquitous, incessant begging
we'll get to that. Make the thing first.
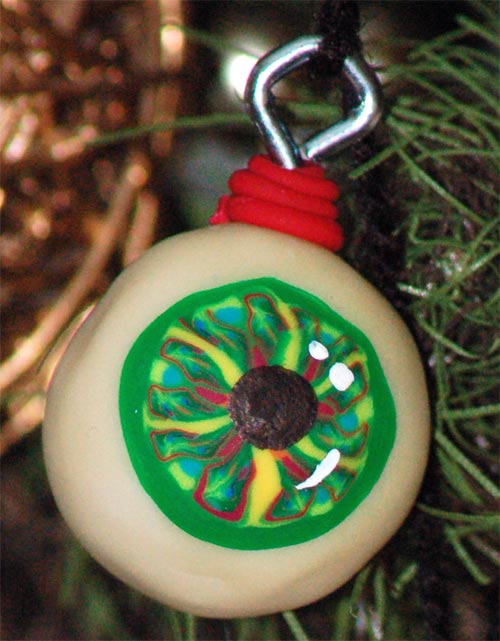
Cover the wooden bead with conditioned white poly clay. You just need a thin layer, but enough to cover the color of the bead. Then, cover the white with a layer of conditioned glow-in-the-dark clay. Embed the small eyebolt into the clay in the top of the charm. I like to roll some very fine "snakes" of a contrasting color and wrap them around the base of the eyebolt as decoration and additional structural support.
Kay. The eyeball is done. Set it aside, somewhere safe. We won't need it for a while. Or you could make a few more, and crank out a whole legion of Santa Eyes, assembly line-style. Your choice. On to the cane!
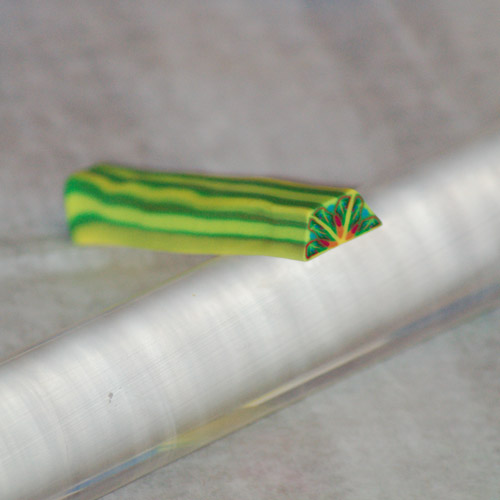
Take a pinch of your main color of poly clay, about the size of a grape, roll it into a very fat, short (approx. .75"/2cm) snake, then use your fingers and the table surface to flatten three sides into it. It should be a reasonably equilateral triangle, when you look at it, end-on.
Choose another color, something that contrasts with your main color, this time about the quantity of a sunflower seed. Roll out another snake to approximately the same length as the chunky triangle. Flatten it slightly; you'll be using it in just a moment.

Rebecca Garcia (photo)
click image to enlarge
Take your tissue blade, line it carefully along the top ridge of the triangle, and slice down about halfway. Take your flattened snake and slide it into this slice, and press gently to close.
Choose another color, perhaps about the size of a marble. This time roll it into a sheet. You want this sheet to fit over the chunky triangle, but only the two sides facing up. Press down gently to get rid of air bubbles and to make sure it's stuck. Once it's in place, use the tissue blade to trim away the excess that drapes over the cane, and press the clay sheet in place.
Repeat the above step with either yet another color, or repeat one of the colors you've already used. If you repeat a color already in use, make sure you use a color that won't touch this one. A nice touch for this layer is to make this one a little bit shorter than the last layer, so the first one peeks out underneath this one.
This is a good start for now. Once you get going with this sort of cane, and really get into the art of making irises, you can make all sorts of variations at this point. I have made inclusions of all sorts of metallic poly clays and other colors at odd angles at this point; please, get experimental. You will love the results. Santa will TOTALLY reward you. This is way better than setting out cookies. Mrs. Claus will reward Santa. Santa will probably reward you MORE
Anyway
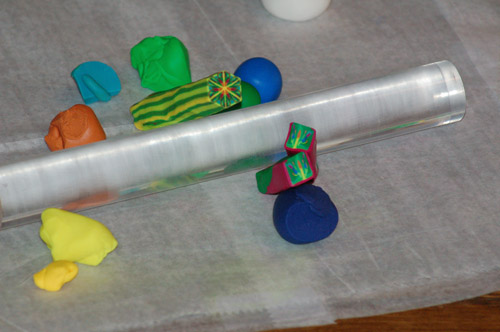
So now you have a beginning of a cane. It's short and chunky. You have to squeeze it down to make it longer, then cut it, then combine it side-by-side, squeeze it down more, add them together, and so forth. The trickiest part of this project is right here, because this cane at this point is not a circle. You have to finesse this cane down, not roll it, snake-like. It's not that hard, you just have to be patient.
Rebecca Garcia (photo)
click image to enlarge
Pick up the chunky triangle and gently squeeze it so that it gets thinner and longer. Try to keep the shape as true as possible. The ends will distort slightly don't worry about that. Trim away the raw edges. Reduce the cane until it is about a third of the size it began but at least twice the length. Slice the cane in half, and press the two canes together at one side.
Choose any color other than the last color you chose, roll out a sheet of poly clay and put it on this new cane. You want it on just the two new sides. Trim the edges.
Out of another color in the amount about the size of a sunflower seed, roll a snake. Set it on top of the new sheet where the two original canes met to form the new cane. Roll out another sheet of poly clay and drape it over the top of the cane, pressing down to fix it in place; trim the excess. Add more layers, make more inclusions (if you choose), and then reduce the cane. Slice it in half, pressing the canes together at one side again, if they will still create a wedge-shaped cane. If they make a crescent-shaped cane, then instead work the two wedge-shaped canes separately but identically.
Rebecca Garcia (photo)
click image to enlarge
This is a basic tessellation repeat. Your goal is to create a round cane from these wedge-shaped canes. Keep slicing and fitting until you have your round cane.
Repeat these steps until you have enough wedges to form a circle when viewed from the end. The smaller the wedges, the more you will have. The more wedges, the more complexity you will have. With more complexity, you will have more similarity to a really dazzling actual iris, human, canine, feline, or otherwise.
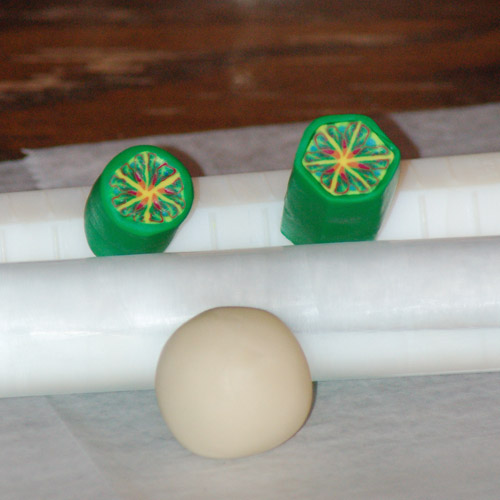
Rebecca Garcia (photo)
click image to enlarge
Once the cane is to your liking, roll it on your work surface to smooth it out a little just a little bit, not so much that you change the size or shape of the cane. Finally, you need to roll a sheet of poly clay that will fit all the way around the cane to give a finished look to your cane. The color? If you choose a color that abuts the edge, it will have a more conservative look. If you choose a color that's more contrasting, it tends to be very dynamic. You could use a very thin layer of gold poly clay, then add a slightly thicker layer of your most commonly used color; that's very striking. Make sure the edges are smooth. Have fun with it! Trim the raw ends.
Let the cane rest for a bit before slicing it. You can cool it down in the fridge or freezer for a bit if you like, to speed up the process. Once you feel like it's stiff enough to be sliced without losing its shape, use the tissue blade to slice very thin irises off of the cane. Place them onto the eyeball, working the edges into the surface so it's nice and smooth and looks eyeball-y.
Time for the pupil! That's the hole in the iris that permits the light to enter the eye. In humans, it's a circle. My cats have pupils that change shape from circles to a pointed ovoid shape. Some amphibians have pupils that open at three points, sort of like a very stylized, bent "T". This is your Santa eye. It's up to you whether you want your Santa to be oppressively frightening or reasonably benevolent. Me? I could go either way. We were equal parts Rankin & Bass and Murder, She Wrote at Christmas in my home, growing up. (Everyone dies near Jessica Fletcher! How frightening is it to be her friend?) I leave the choice up to you.
The best choice for pupil color is black, and you can make it two different ways. If you make it from poly clay, pick up a small piece of clay, work it into the shape you want, and place it into the center of the iris. The other method must be done AFTER baking: once the eyeballs are cool, take either a black permanent marker or some black acrylic paint, and make the shape you'd like with the marker or brush directly onto the cured and cooled surface of the iris.
Once your eyeballs are assembled (and without paint or marker pupils) bake them according to your clay's manufacturer's instructions.
After your baked Santa eye is cool, and after you draw or paint your pupil onto the iris (if you choose that method), if you'd like to add a big, bushy eyebrow, glue a small remnant of fun fur securely above the iris and in front of the eyebolt. S'kinda cool. A little sinister, depending. You may even want that. Depending.
Thread a finished Santa Eye on your cord and voilá! It's a Festive Pendant of Taunting! What? You don't want something to dip in the gravy when you lean over to swat Uncle Henry's bald head after his 5th unspeakable comment about alligators and roughage during dinner? No worries. You're creative. String several eyeballs on the cord with some cleverly placed ribbon, and hello! You've got a Fetching Bracelet of Bauble-ly Batting Bangle Eyes. Not what Lena Horne was singing about, but there it is. Perhaps you might even have some ear wires; these glowing globes would be lovely dangling from your lobes. No one will ever doubt again that you have eyes in the back of your head.
So now it's done. A Santa Eye. Or several Santa Eyes. What now? WEAR IT. The rule from this point forward is: you tell your shopping companions that they get three "begs", or "I waaaaaaaants" for the season. Filling out an actual gift list (or adding to it) doesn't count. But tagging along to a store and incessantly whining is simply not welcome at this time of the year, not when there are already too many other stressors. So, to be more than fair, you permit three "begs". Period. After that, the wearer of the Santa Eye starts showing the eyeball and making reminders, which turn into dire threats you can say you're only passing along from The Big Bearded One.
The Eye is as good as a deputy's star when it comes to wrapped goodies and high expectations.
Make sure you wear it at night when tucking the whiniest of whiners into bed. Charge it up really well under a bright light first for best effect, so it dangles in their mind like an Atomic Stuffed Olive of Doom. Just the thing to chase away those pesky Sugar Plum Fairies.
You are so very welcome.
PS: I know you'll find a way to work it into a variety of other holidays as the Easter Bunny's Eye, or Jack Skellington's Eye, or The Scurrrrrvy Eye of Deadeye Jack (International Talk Like a Pirate Day??) or My Eye's On You To Remember Our Anniversary (perhaps a stretch)
About
 contact Rebecca:
• legal info
contact Rebecca:
• legal info
![]()
home • antifesto • this issue • archive • submit • errata • masthead • contact us • legal