

 |
 |
 |
 |
 |
 |
 |
 |
wa na na na na na na na bat shawl! > alia > parlor round >
fuck off, i'm trying to read > run away! > algormortis >
baba yaga > bonjour, nazar boncugu > impaler

Rebecca Garcia (photo)
click to enlarge

(Good Day, Evil Eye)
There's a difference between pulling faces with someone you know and have affection for, and then trying the same games with someone who's a complete stranger. I'm reminded of Dan Ackroyd's character in the movie, Twilight Zone: The Movie, a few seconds after he asks, "You wanna see something scary?"
Yeah. I guess that was a warning.
Suggested Listening
"Arabian Nights" by Siouxsie and the Banshees
Suggested Watching
Twilight Zone: The Movie (1983, rated PG)
Difficulty
Boy Scout Dropout
Click here for definitions of difficulty levels.
Finished Measurements
Varies; this cane will make several projects: bracelets/pendants and a votive candle holder.
Materials
- Polymer clay, black, 1 oz (28.35g)
- Polymer clay, translucent, 8 oz (226.8g), divided use
- Polymer clay, yellow or orange, 1 oz (28.35g)
- Polymer clay, white, 2 oz (56.7g)
- Polymer clay, royal or ultramarine blue, 3 oz (85g)
- Rolling pin or pasta machine
- Toaster oven (or aluminum foil, if using regular oven; see Design Notes)
- Tissue blade
- Sharp piercing tool
- Glass votive candleholder
- PVC glue
- Small metal threaded eye bolts (jewelry-sized)
- Beading floss or cord
Design Notes
Turkish is an amazing language, and Turkey is a most awesome place. The language uses the Latin alphabet, but this was not always true: it's a 20th Century change. As a result, many sounds in Turkish do not line up as "neatly" as they do in languages that have evolved using the Latin alphabet. Nazar Boncugu is pronounced "NAH' zahdh BONE' zhook". It's fun to say. Say it a lot! Say it, and imagine yourself in Ankara, 800 years ago. Have a tiny cup of strong, thick coffee, try not to smudge the kohl around your eyes, and say it again.
Polymer clay is not food safe. Not ever. Not when it's in "clay" form, not after it's been cured ("baked"). Working with polymer clay should be done with dedicated tools. This means tools set aside specially for that purpose only. Please don't mix the tools you use for polymer clay with tools you use for preparing food.
If you use the same oven to bake polymer clay that is used to prepare your food, don't worry! Here's how you protect yourself and your family: Use aluminum foil to make a tent' over the baking tin that you use for baking the poly clay. This will contain the fumes and particulates, keeping them from depositing on the walls of your oven. The danger behind deposited particulates is they can contaminate food the next time (actually, the next several times) you use your oven. The polumers used are known carcinogens when ingested. This means please also wash your hands after handling them before eating or smoking.
This project covers making beads and votive candle holders, pictured at the end.
This is a jellyroll cane, perhaps the easiest polymer clay cane to make. When you look at it end-on, it resembles a bull's eye'. Each layer is rolled onto the next, and the real trick is to taper each end of the roll, so there are no visible lumps in your cane. The smoother, the better! Canes start out large, and are rolled (or extruded) into smaller versions of themselves. Keep this in mind as you work: it's not a bad idea to keep some lengths of your cane large, and continue working other lengths to smaller widths.

Building the jellyroll cane.
Rebecca Garcia (photo)
click image to enlarge
Begin with the black polymer clay. This is going to be the very inside of the eye. Condition the clay by working with it; this loosens it up and makes it easier to work with. If the clay becomes too loose, wrap it up and put it in the freezer for 10-15 minutes (longer if it's very thick) to restore a little stiffness.
Make a "snake". You've probably done this a million times with Play-Doh®, but here's a reminder: roll the poly clay into a ball, then with the heel of your hand apply even pressure against the ball of clay, rolling it onto the working surface. Your snake should have a smooth, un-dented surface, and should measure approximately 1/2" (1.27cm) thick at this point. You do NOT want it to be the finished size yet: it will be too small inside the cane, if it is. Roll it back up and start over. You can do that at this point only.
You may want to wash your hands and tools before you handle another color at this point. The black pigment may have left a residue behind, and you may not see it until you start to condition the yellow or the white.
Yellow or orange is next. Mix 2 oz. (56.7g) translucent poly clay with your color. Condition the clay, roll it into a 1/8" (3.2mm) sheet with one tapered edge, trim, and carefully wrap around the black core. Watch out for air bubbles while you wrap, and smooth down the edges (both front and back) of the roll to make sure it's a nice, smooth wrap
Condition the white polymer clay. Do not mix this color with the translucent. Follow the other procedures, and wrap this color around the yellow or orange layer.
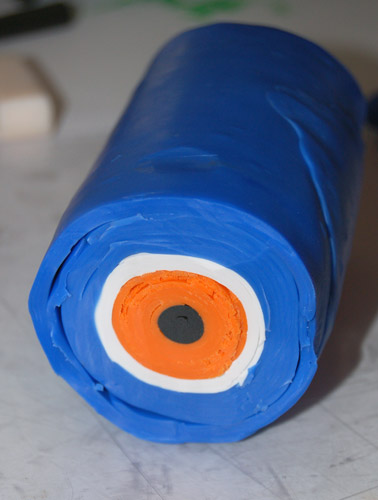
Cane, ready to work thinner.
Rebecca Garcia (photo)
click image to enlarge
Your next layer is the blue, which will be mixed with 6 oz (113.4g) of translucent. This is your final layer, and it should be a very thick layer.
Your cane may be very thick at this point, and the ends of all of the layers of clay should be fairly even. Apply pressure as evenly as possible to the cane, and work it into an increasingly lengthening snake. You want to make the cane squeeze down in width and lengthen, while preserving the design inside, simultaneously. Once you get the length of your cane to a length that is too long for you to manage comfortably, slice it in half and work each half separately. In fact, it might be nice to have canes of different sizes, so you have the option to choose to NOT continue working the other half at that point! You can always make a cane smaller. It is impossible, without adding more layers, to make it bigger.
When you get your cane to the size bead you want, stop working it. Your cane needs to rest before you start slicing it.
If you need beads or a votive TODAY, wrap the cane carefully and put it in the freezer so the polymer molecules can relax again. Give it 15-20 minutes chill out time. If you have time, or you choose not to put your uncured clay with food, let your clay rest 6 hours to overnight.
If you want a pierced-through bead, it's best to pierce while the bead is still part of the cane. Measure and mark off where you will be slicing, and then use your sharp piercing tool to drive down carefully through the cane. THEN pierce each bead, as marked off in the cane. You'll want to go all the way through, and then once you get to the other side, poke back through the hole in the opposite direction to make the opening smooth. Using a very sharp tissue blade, slice down onto a cut-safe surface. If you slice off your fingers, you did this all wrong. Start over. Your evil eye wards are not working.
If you'd prefer to just use eyebolts, pre-pierce shallow holes for the eyebolts. Dip the eyebolts in PVC glue and permit them to dry just a little while. This keeps the glue from boiling and forcing the bolts out of the holes while the bead is baking. Once the glue is a little wetter than tacky to the touch, press them into the holes. Let them dry a little longer before baking.
You're ready to bake your beads. Follow the manufacturer's instructions. Different poly-clay manufacturers' instructions vary slightly, so pay attention! It's still ok to mix them. If they explode in the oven or release the hordes of hell or start your neighbors gossiping, you did this all wrong. Start over. Your evil eye wards are not working.
Moving on to the glass votive candleholder. Apply a thin layer of PVC glue to the outside surface of the glass. It is only necessary to put glue on the site/s where you will be fixing your slice/s of cane. (It'll stick without it, but not permanently.)
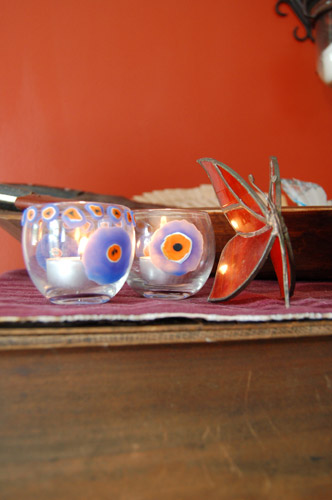
Finished votive candle holders.
Rebecca Garcia (photo)
click image to enlarge
With the same bull's eye nazar boncugu cane, take a slice and roll it slightly thinly on a very smooth surface. Carefully peel it off the surface, once you get it to the right shape and size, and apply it to the tacky surface of the glass votive. Work it with your fingers until it smoothly sits on the surface of the glass. Cover the votive in a like fashion as much or as little as you like. Thinner poly-clay means you will have a more translucent votive. Don't limit yourself to votive holders I also used clear and white glass tree ornaments as bird- and rabbit-wards for my vegetable garden. (They are only evil when they steal my food.) It also means you may need a shorter baking time, so you may have to adjust. Bake until done (I baked mine 10 minutes); again, follow the instructions on the poly-clay packaging. If the slime creatures in your kitchen sink start climbing out to raid your yarn stash, or your hair turns green (but you were going for vivid magenta), you did this all wrong. Start over. Your evil eye wards are not working.
When the beads are baked and cooled, string'em up. Wear them. Hang them in your kitchen. Watch your dairy products and see how slowly your milk gets curdled. Light a candle in the votive and place it between you and whichever neighbor seems most dangerous. (Note: However tempting it may seem, regardless of road-rage, it is never safe to burn candles in a moving car.)
About
contact Rebecca:
• legal info
![]()
home • antifesto • this issue • archive • submit • errata • masthead • contact us • legal