

 |
 |
 |
 |
 |
 |
 |
 |
miss monster's favors > tetsujin no purasutekku > baby's first teratoma >
beaded pendant of blindness and insanity > i [heart] zombies > glaistig >
samhain surprise: silvanus
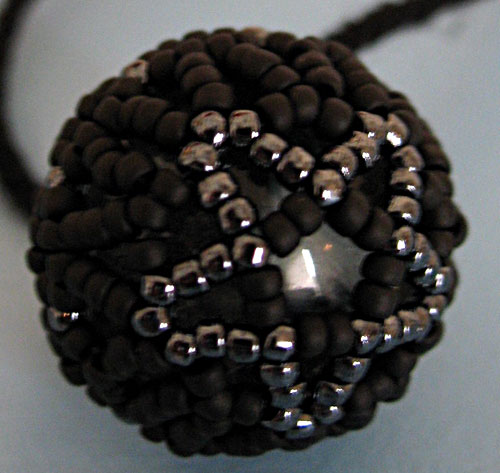 Beaded Pendant of Blindness and Insanity
updated 10/20/06
In discussions about the recent upsurge in craft popularity, people often talk about a time "when craft wasn't cool". Somehow, more through complete obliviousness than lack of concern, I never noticed that such a time existed. During those supposedly dark years, I could reliably be found hunched over my desk in grave-faced experimentation with teeny tiny beads. My dear poppa was fond of calling out, as he passed the doorway to my room, "You'll go blind and insane!" I would reply by muttering, "That may be, Pops, but this ain't how." Now, a decade later, I commemorate my dear poppa's concern for my eyesight and mental health by sharing the dangly fruits of those labors.
The meat of this pattern is in the placement of the beads, but the image possibilities are inexhaustible. Once you have made one pendant, you can stare at it until various shapes emerge, and change bead colors accordingly. (The author would like to note that she did not employ any illegal substances to invent her patterns. Simple sleep deprivation and a tendency to stare into space were all she needed.)
 A symmetrical pattern, like the Five Pointed Star described below, or even a solid color, is a good place to start. For the adventurous, I have included a color chart for the more complicated Dia de los Muertos, which features a grinning calavera on one side and a flower on the other. These pendants take approximately one hour each to make, and have served well as quasi-last-minute gifts.
Suggested Listening
Grossiennes
by French composer Erik Satie
Difficulty
Boy Scout Dropout
Click here for definitions of difficulty levels.
Finished Measurements
11/16" in diameter.
Download
General Guide to Pendant Steps (pdf format)
Five Pointed Star color chart (pdf format)
Dia De Los Muertos color chart (pdf format)
Printer-friendly version of this project page (pdf format)
Materials
- Size 14 seed beads, 1 vial each, in colors Matte Black (B) and Gunmetal (S)
- Nylon bead thread, black
- Beading Needle, size 12 (or other size small enough to pass through the teensy beads, yet still able to accept bead thread passing though it)
- One (1) marble: 0.5" in diameter. (I use the clear ones meant for fishbowls or flower arrangements)
- Cord or Chain to wear the thing on when it's done
Abbreviations
B black bead(s)
Pnt Pass needle through
Rnd Round
S gunmetal/silver bead(s)
Str string onto thread
* asterisks indicate a section to be repeated
Design Notes
One pendant uses 348 beads total, so one vial of each color should be enough for several pendants.
In the directions below, you will see an illustration of each round before the written directions for that round. All illustrations are marked to let you know to which round they refer.
If blindness is a concern, there are work lights with magnifying lenses available for crafters such as yourself.
If insanity is a concern, I can't help you. Just go with it.
Author's Disclaimer:
This pattern is offered to the crafty masses for personal use. The author accepts no responsibility for any medical condition that may arise from the use of size 14 beads. It's a matter of scale. Use pony beads and a tennis ball if you want to (though I imagine that would be quite hideous).
Directions
Section 1:
Measure 40" of beading thread (slightly more than a yard is plenty) and thread through needle.
*String (Str) 2B, 1S; rep from * 4 more times (15 beads)
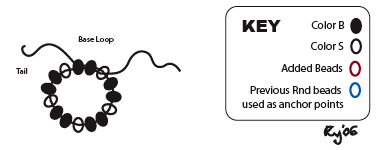
Base Loop: Make a Base Loop by going through the first 3 beads (BBS) again, in the same direction as before. Leave 3-5" of thread as a tail.
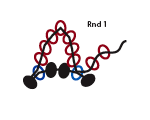
Rnd 1: *Str 7S, Pass needle through (Pnt) 3rd bead (color S) on Base Loop; rep from * 4 more times, Pnt beads 1-5 on the first petal of this rnd.
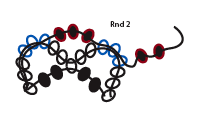
Rnd 2: *Str 3B, Pnt beads 3-5 (the middle 3) of next Rnd 1 petal; rep from * 4 more times; Pnt beads 1-2 on the first petal of this rnd.
Rnd 3: *Str 8B, Pnt bead 4 (the middle one) of next Rnd 1 petal, Str 8B, Pnt bead 2 (middle) of next Rnd 2 petal; rep from * 4 more times; Pnt beads 1-5 on the first petal of this rnd.
Sit up straight and stretch. It's okay if the crumplepus of beads you just strung together is kind of loose and wonky. In the near future, it will be tightened up around the marble.
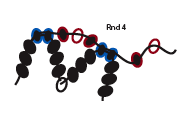
Rnd 4: *Str 1B,1S,1B, Pnt beads 4-5 (middle 2) of next Rnd 3 petal; rep from * 9 more times; Pnt beads 1-2 on the first petal of this rnd.
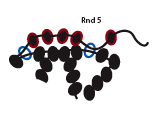
Rnd 5: *Str 4B, Pnt bead 2 (middle) of next Rnd 4 petal; rep from * 9 more times; Pnt beads 1-3 on the first petal of this rnd.

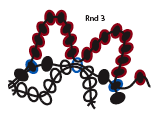
Rnd 6: *Str 7B, Pnt beads 2-3 (middle) of next Rnd 5 petal, Str 3B,1S, 3B, Pnt beads 2-3 of next Rnd 5 petal; rep from * 4 more times; Pnt beads 1-4 on the first petal of this rnd.
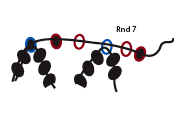
Rnd 7: (as you add beads, don't pull thread snug just yet) *Str 1B, 1S, Pnt bead 4 (middle) of next Rnd 6 petal, Str 1S, 1B, Pnt bead 4 of next Rnd 6 petal; rep from * 4 more times; Pnt next 4 beads (beads 1-2 of next Rnd 7 petal [B,S], bead 4 of next Rnd 6 petal [S] and bead 1 of next Rnd 7 petal [S]). Thread should now exit the last in a set of 3 S beads.
Drop in a marble and gently pull thread until it fits like a sinister little glove.
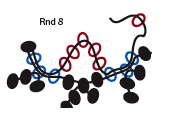
Rnd 8: *Str 5S, Pnt next set of 3 S beads (Bd 2 Rnd 7, Bd 4 Rnd 6, Bd 1 Rnd 7); rep from * 4 more times; Pnt beads 1-3 on the first petal in this rnd.
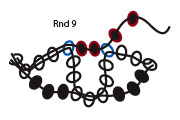
Rnd 9: *Str 2B, Pnt bead 3 (middle) of next Rnd 8 petal rep from * 4 more times; pass through all beads in this rnd once more to secure them, making sure to end after exiting a bead 1 Rnd 9. The top hemisphere of the marble should be completely tightened at this point.
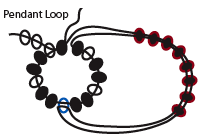
Pendant Loop: St 8B, Pnt bead 3 (middle) of opposite Rnd 8 petal, Pass back through 8B loop beads, Pnt bead 2 of Rnd 9 petal where pendant loop started. Pnt Rnd 9 to the beginning of pendant loop and through loop once more to secure.
Finishing:
Work your way south. Your thread longs to reunite with its long-lost tail. Make a beeline for the Base Loop, with the goal of exiting the bead next to the one your tail is exiting. They face each other."Buddy! How's your sister? You've gained weight!" etc. Interrupt the banter and tie a square knot (with an extra R over L for good measure). Those ends go their separate ways again as you tuck them in, wandering their way around the globe. Once both ends are sufficiently tucked, give them a little pull as you snip them close to the beads and they will hide themselves effectively.
Ta Daaaaa! String onto a chain or cord and strut!
About
contact Rachel • http://blog.rubyblackbird.com/ • legal info
![]()
home • antifesto • this issue • archive • submit • errata • masthead • contact us • legal