

 |
 |
 |
 |
 |
 |
 |
 |
miss monster's favors > tetsujin no purasutekku > baby's first teratoma >
beaded pendant of blindness and insanity > i [heart] zombies > glaistig >
samhain surprise: silvanus
 Purasuchikku no Tetsujin
(Plastic of Iron Man)
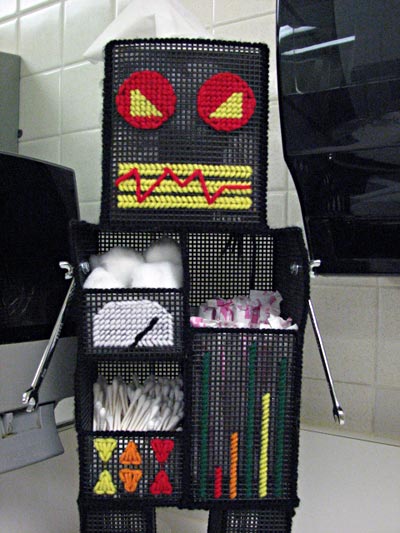
Ever think, "Gee, these tampons would look so much better ensconced in a scary robot?" Here's the answer to your prayers.
Suggested Viewing
Giant Robo
by Mitsuteru Yokoyama
Difficulty
Boy Scout Dropout
Click here for definitions of difficulty levels.
Finished Measurements
6.5"W x 19.75"H x 14.5"D
Download
Iron Man of Plastic schematic and embroidery guide (pdf format)
Materials
- 5 sheets of black plastic canvas
- Small amounts of black, red, green, orange, yellow, and white yarn.
- Tapestry needle
- Permanent marker
- 2 6mm wrenches with socket on one end and crescent wrench on the other, or any size that is 5" long
- 2 wing screws, #8-32 x3/8", or size needed to fit into socket end of wrench
- 2 #8 zinc washers, or size needed to match wing screws
- 2 #8-32 machine screw nuts, or size needed to match wing screws
Design Notes
It's not so much important that the pieces all measure the same size by the ruler, but that the number of squares are the same in each piece. It will help to cut all of each piece out at the same time, so you can measure them against each other.
In assembling the robot, it's easier to work from the middle out so that you have to cram your hands into small spaces as little as possible.
Use the smallest tapestry needle your yarn will allow; the medium-size needle from a Clover™ Chibi worked well. If you use a larger needle, you might want a thimble or a pair of pliers to help you get it through the squares in the canvas.
Directions
Step 1:
Cut out pieces of plastic canvas according to the schematic.
Step 2:
Place appropriate pieces of canvas over templates and trace designs using a marker, or make up your own designs. Embroider designs onto plastic canvas.
Step 3:
Whip stitch pieces of robot together using the schematic.
Step 4:
Determine where you want to bolt on the wrench-arms. I placed mine 1/4 of the way down from shoulder, 1/3 of the way back from front of torso. With scissors or hobby knife, cut out the plastic bar between two squares. Thread wing screw through socket end of wrench and into hole on side of torso. Secure with a washer and nut on inside of torso. Tighten.
About
![]()
home • antifesto • this issue • archive • submit • errata • masthead • contact us • legal