
 |
 |
 |
 |
 |
 |
 |
 |
miss monster's favors > tetsujin no purasutekku > baby's first teratoma >
beaded pendant of blindness and insanity > i [heart] zombies > glaistig >
samhain surprise: silvanus
I'm a teratoma, short and stout;
Here is my handle, here is my snout;
When I get all steamed up and I shout,
Poke a finger in and pull stuff out!
---
My teratoma, My teratoma,
Wherever I go, he goes,
My teratoma, My teratoma,
I’ll teach him everything I know…
My teratoma and me
Like to climb up a tree
My teratoma and me
We're the best friends that could be
My teratoma, My teratoma
My teratoma and Meeeee!
---
Make new friends, but keep the old,
one is fleshy cellular slime mold!
Suggested Listening
"Happy Together" by The Turtles
Difficulty
Strong Intermediate
Click here for definitions of difficulty levels.
Finished Measurements
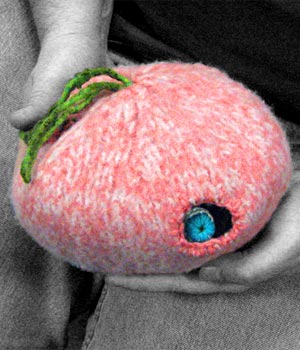
Approximately the size of a grapefruit. Will vary with felting.
Materials
- Teratoma Body:
- Cascade yarns Cascade 220 [100% wool, 220yd/201m per 3.5oz/100g skein]; 1 skein each in hot pink (9469), light pink (9477), and heather spring green (9461)
- Cascade yarns Cascade 220 Superwash [100% superwash wool, 220yd/201m per 3.5oz/100g skein];1 skein in olive green (888)
- 1 16"/40cm US 15/10mm circular needle OR 1 set of 10" US 15 dpns
- 1 set of 8"/20cm US 15/10mm dpns (if using a circular needle)
- 8-12 empty plastic grocery bags
- Size J/6mm crochet hook
- Safety pins
- Pillowcase
- Scissors
- Tapestry needle
- 8 stitch markers
- Waste yarn, several yards
- Eyeball
- #3 crochet cotton or other thread of your choice in white
- #4 crochet hook
- Yard or so of blue yarn
- Blunt tapestry needle
- Teeth
- #3 crochet cotton or similar
- Steel crochet hook, about a #3 or #4
- Hand
and Foot
- Patons Kroy Sock Yarn in Muslin, color 24008, or other suitable scraps
- Steel crochet hook, about a #3 or #4
Gauge
Unimportant, as it will be felted. You will probably notice that the green side has a larger gauge than the pink side; this is ok. The teeth an eyeballs can be any size, really, as the holes they will disappear into can be cut to size.
Desgin Notes
The teratoma body is knit and the accompanying bits are crocheted. US crochet terminology is used.
The hot pink and light pink yarns are held together as one through the entire teratoma body pattern and are referred to as "pink". The olive green and heather green yarns are also held together as one and are referred to as "green".
The teratoma body is a sphere that is knit like two hats. You provisionally cast on what will be the middle of the sphere (the brim of the hat) and knit up to the top with a star decrease. Then you undo the provisional cast on, pick up the sts, and do it again on the other side. Be sure to stuff it with plastic bags before you are completely done knitting it, of course.
The entire teratoma body is double knitted so that you actually have two spheres when you're done, one inside the other. When felted, the inner sphere will be lumpy and gross because one of the green yarns is superwash wool and will not felt. The pink outside sphere, however, will felt beautifully and evenly.
This is not a good first project to learn double knitting, as it will not be explained in the project instructions. You can learn to double knit here: http://knittinghelp.com/knitting/advanced_techniques/
(scroll down to about the middle of the page)
Directions
Body, First Half
Provisionally cast on 64 sts with two separate length of waste yarn onto circular needle or long . Alternate the cast on sts so that you have 32 sts from waste yarn A and 32 sts from waste yarn B. The sts on the needle should be A B A B A B, etc.
Double knit 1 round: knit pink into cast on sts from waste yarn A and purl green into cast on sts from waste yarn B. PM at end of round to mark where new rounds begin.
Continue double knitting as established for rounds 2, 3, and 4.
In round 5, *k 8, pm. Repeat from * 6 times. k 8. You should now have added 7 more markers (total of 8 markers on needle) and have a marker every 8 sts.
In round 6, continue double knitting as established but work a k2tog for both pink and green before a marker. This is tricky because if done incorrectly you will join the spheres together and see green yarn on the pink side. To do it correctly, stop knitting when you have 4 sts before the marker (2 pink and 2 green). Position your right-hand needle as if you were going to k3tog (a pink, a green, and a pink). Move your needle through the pink st, skip the green st, and through the next pink st. Knit them together. Drop the green st that was between them off the left hand needle carefully, pull it to the back so that you can't see green yarn on the pink side, and place it back onto the left-hand needle. Purl the two green sts together. Voila, your spheres remain autonomous.
Rnd 7: double knit across round
Rnd 8: decrease rnd
Repeat rnds 7 and 8 until you have 4 sts between marks (2 pink sts and 2 green sts). Change to dpns whenever necessary if you are using a circular needle.
Repeat rnd 8, removing markers as you go. You should now have 16 sts (8 pink sts and 8 green sts).
Carefully separate the sts onto separate dpns or pieces of waste yarn. † Cut yarns, leaving 10" tails. Run pink yarn tail through pink sts and pull tight. Fasten pink yarn on inside of pink (half-)sphere. You will probably have to turn the work so it is stilling like a bowl in your lap and fasten it to the inside of the pink while working through the opening in the green side. Do the same for green yarn, and fasten it on the inside.
Body, Second Half :
Pull out the provisional cast on and place live sts on circular needle (or long dpns).
Follow directions for First Half up to †. Be sure to start stuffing with plastic grocery bags during the decrease section.
Cut yarns, leaving 24" tails. With green yarn tail and crochet hook, slip stitch through each live st, leaving a nicely defined hole. Fasten green yarn inside green sphere. Repeat with pink yarn tail.
Fulling (Felting):
Place your grotesque creation in a pillow case. Fold the open end of the pillowcase onto itself and pin it shut with safety pins. Agitate in the wash until it is grapefruit-sized (about 20 minutes for mine with hot water, two towels, and a pair of jeans). Poke your fingers in and remove plastic grocery bags. Allow to dry completely, which will take about two or three days for the green sphere.
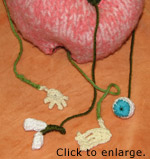
[You cannot have a proper teratoma without at least one eyeball.]
This is a bit like crocheting a golf ball. There is a marked resemblance.
Make a slip knot and chain 2. Make 6 single crochet in slipknot.
Join. Make two single crocket in each single crochet around.
Join. One single crochet in next single crochet; 2 single crochet in next single crochet. Repeat around and join.
Work 3 rounds even.
Work two decrease rounds reversing increases made above.
Stuff with a knot of yarn ends. Thread tail into tapestry needle and stitch shut.
With blue yarn, embroider an iris to taste. I made straight stitches into the end, using a round of crochet as a guide for the length of the stitches.
Notice and appreciate the resemblance to a golf ball with personality. Dampen slightly and roll in your palms to shape nicely.
Teeth:
Two modes. Choose, or do one of each.
Root up:Leaving a 6" tail, make a slip knit, chain 4 and make 4 double crochet in the original slipknot. Join to first double crochet.
Chain three; one double crochet in each double crochet. Join and finish off.
Bring both tails through to the base of the root [beginning] and knot together. Knot at about ¾ inch intervals to represent the dendrites of the roots. Snip off about 1 ¼ long.
Attach with a ribbon to the interior of the teratoma.
Crown down [preferred method - it' s toothier]:Make a slip knot, chain 2 and make 6 single crochet in slipknot. Join; chain two; one single crochet n each single crochet. Join.
Working in the back loops only of the single crochet, work one round of double crochet. Join.
Working double crochet, decrease three times. End off.
Bring both tails through to the base of the root [beginning] and knot together. Knot at about ¾ inch intervals to represent the dendrites of the roots. Snip off about 1 ¼ long.
Attach with a ribbon to the interior of the teratoma.
This tooth benefits from a touch of damp forming with your fingers. A bit of twist gives it more character.
Hand:
Make slipknot; chain two;
Make six single crochet in slipknot. Join.
Chain 2, work 2 single crochet in each single crochet of the previous round. Join.
Begin fingers. Work loosely for nice wormy fingers.
Chain 3, slip stitch in 2 chains; slip stitch in next single crochet of circle.
*Chain 5, slip stitch in 3 chains; slip stitch in next single crochet of circle. Repeat from * three times (to form a total of four fingers).
Slip stich in next single crochet and make thumb as first finger was made. End off.
Use tail to crochet a chain to represent the atrophied arm.
Foot:
Leaving an 8 inch tail, make a slipknot and chain 4. Make three more double crochet into slipknot.
Chain 3, turn.
Double crochet in next 3 stitches.
Toes are formed of picots of assorted sizes. The Great Toe is chain 3, one single crochet in chain slipstitch in double crochets. The remaining toes are chains of 2/3 stitches joined to the foot with a slipstitch.
Use the tail to crochet a chain for the atrophied leg.
Grab a beer and start cutting random holes into the soft pink flesh of your teratoma. Some of the holes can have corresponding holes in the green sphere, some can just be in the pink sphere. When you are satisfied with the holes, blanket stitch around them using a single strand of hot pink yarn. If you have a pink hole with a corresponding green hole, stitch through both spheres to keep them aligned.
Firmly sew tail ends of the various Parts inside the teratoma. This will take some finger acrobatics. Stuff Parts into the teratoma.
Poke your fingers in and pull Parts out of the teratoma. Stuff Parts into the teratoma. Repeat while singing "I'm A Teratoma" ad nauseum. Isn't it fun?
About
contact Zabet or contact Jane • legal info
![]()
home • antifesto • this issue • archive • submit • errata • masthead • contact us • legal
 Baby's First Teratoma
