
 |
 |
 |
 |
 |
 |
 |
 |
miss monster's favors > tetsujin no purasutekku > baby's first teratoma >
beaded pendant of blindness and insanity > i [heart] zombies > glaistig >
samhain surprise: silvanus
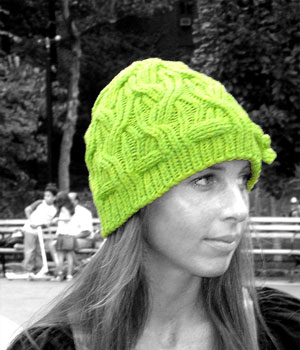
Half beautiful woman and half goat, the Glaistig is a mythological creature of Scotland and Wales who was by some legends malevolent (seducing men into dancing with her, then sucking their blood) and by some benevolent (a guardian of cattle or children). She wore a long green robe to conceal her goat parts. I imagine that she might also wear this hat to conceal her eyes (and her intentions).
Suggested Reading
The Fairy Tradition in Britain
by Lewis Spence
Popular Tales of the West Highlands
by J. F. Campbell
Difficulty
Strong Intermediate
Click here for definitions of difficulty levels.
Finished Measurements
Fits most adult female heads, 19-23" in circumference. The hat itself is very stretchy; plus you knit the ribbed band exactly to size. If your head is on the larger end of the range, you may want to go up a needle size (do not go up a size for the ribbed band, however). You can also make a child size by using one strand of the DK-weight Koigu Kersti (it comes in the same colors as KPM/KPPPM) and a size 5 or 6 needle.
Download
Glaistig Ribbed Cable chart (pdf format)
Materials
- Koigu KPM (solid) or KPPPM (variegated) [100% merino wool, 175yd/160m per 1.75oz/50g skein]; 2 skeins in the color(s) of your choice. Hat shown uses two skeins of KPM in light green (#2349). I find it also looks good in 2 contrasting solids, or with one variegated skein and one coordinating solid skein.
- 16"/40cm US 8/5mm circular needle
- 8"/20cmUS 8/5mm dpns
- Cable needle
- Tapestry needle
Gauge
16sts x 24 rows = 4"/10cm in Ribbed Cable pattern, slightly stretched
Design Notes:
A strand from each skien is held together throughout.
This hat is knit bottom-up in the round. In the transition from brim to crown, yarnovers are spaced evenly around the hat to create eyelets. The ribbed band is knit to size, then woven through the eyelets and buttoned closed to ensure a perfect fit.
The stitch pattern is reversible, should a matching scarf be desired. The edges of the scarf will be wavy; if this is unacceptable, add 4 stitches in k1, p1 rib to each side of the scarf.
I used the alternate cable cast-on, which is best described in The Reader's Digest Knitter's Handbook (ISBN:0762102489). I find this technique is much easier and faster than the tubular cast-on, but looks nearly identical.
Abbreviations
FC (front cable): Slip 4 stitches to cable needle and hold to front, (k1, p1) twice from left needle, (k1, p1) twice from cable needle.
BC (back cable): Slip 4 stitches to cable needle and hold to back, (k1, p1) twice from left needle, (k1, p1) twice from cable needle.
HBC (half back cable): Slip 2 stitches to cable needle and hold to back, (k1, p1) from left needle, (k1, p1) from cable needle.
YO: yarnover.
P2tog: purl the next two stitches together.
K2tog: knit the next two stitches together.
SSK: Slip two stitches knitwise, return them to left needle, and knit them together through their back loops.
Dec2: slip 1 stitch knitwise, knit two stitches together, pass slipped stitch over the two stitches that were knit together.
MB: (K1, YO, k1, YO, k1) into next stitch, and turn work. P5, turn work. SSK, k1, k2tog, turn work. P3, turn work, dec2.
Directions
Worked over a multiple of 12 stitches.
Rounds 1-7: *K1, p1, repeat from * around.
Round 8: *FC, (k1, p1) twice, repeat from * around.
Rounds 9-15: *K1, p1, repeat from * around.
Round 16: *(K1, p1) twice, BC, repeat from * around.
Repeat rounds 1-16 for pattern.
Or, if you prefer, download Glaistig Ribbed Cable chart (pdf format)
Band Pattern:
Worked over 5 stitches.
Row 1 (RS): (K1, p1) twice, k1.
Row 2 (WS): Slip 1 stitch purlwise, k1, p1, k1, slip 1 stitch purlwise.
Repeat rows 1 and 2 for pattern.
Using circular needle, and 2 strands of yarn held together, cast on 96 stitches. Join into a round, being careful not to twist stitches. Work 8 rounds in k1, p1 rib. (If you use the recommended alternate cable cast-on, be sure to work the knit stitches through the back loop on the first round.)
Work eyelet round: *k1, p1, k1, p1, YO, p2tog, repeat from * around.
Work two complete repeats of Ribbed Cable pattern. Decrease for crown:
Round 1: *SSK, (k1, p1) 5 times, repeat from * around. (88 stitches remain.)
Round 2: *SSK, p1, (k1, p1) 4 times, repeat from * around. (80 stitches remain.).
Round 3: *SSK, (k1, p1) 4 times, repeat from * around. (72 stitches remain.)
Round 4: *SSK, p1, (k1, p1) 3 times, repeat from * around. (64 stitches remain.)
Round 5: *SSK, (k1, p1) 3 times, repeat from * around. (56 stitches remain.)
Round 6: *SSK, p1, (k1, p1) 2 times, repeat from * around. (48 stitches remain.)
Round 7: *SSK, (k1, p1) 2 times, repeat from * around. (40 stitches remain.)
Round 8: *SSK, p1, k1, p1, repeat from * around. (32 stitches remain.)
Round 9: *SSK, k1, p1, repeat from * around. (24 stitches remain.)
Round 10: *SSK, p1, repeat from * around. (16 stitches remain.)
Cut yarn, leaving an 8" long (or longer) tail. Thread yarn onto a tapestry needle. Draw the yarn tail through the remaining stitches twice, and pull tight to close. Weave in ends.
Ribbed Band:
Using straight needles or dpn's and 2 strands of yarn held together, cast on 5 stitches.
Work 6 rows in Band Pattern.
Work eyelet row:
K1, p1, YO, p2tog, K1.
Continue working in Band Pattern, starting with Row 2. Work until the working edge of the band touches the eyelet when band is stretched comfortably around the head, ending on Row 2 of the pattern.
Work bobble row:
K1, p1, MB, p1, k1.
Work row 2 of Band Pattern, working all three central stitches through their back loops (this keeps the bobble from waggling around). Work 4 more rows in Band Pattern (starting with Row 1), and bind off all stitches in pattern. Weave in ends.
Finishing:
Weave band through the eyelets in the hat, so that the bobble is facing out. Push the bobble through the band's eyelet to close.
About
contact Sami • http://delcroissant.blogspot.com • legal info
![]()
home • antifesto • this issue • archive • submit • errata • masthead • contact us • legal
 Glaistig
