

 |
 |
 |
 |
 |
 |
 |
 |
terpon's cup > restraint > hoist by your own picard > jíbara >
brainfreeze tribute > flask jacket > virgin sacrifice > obey santa
Carin Huber (photo)
It's what you apply to your slave's wrist or ankle.
It's what you ask of a dirty old man in a forum full of crafty girls. (He knows who he is.)
It's what you show when your servant spills the wine again. Unless you don't.
Suggested Reading
The New Topping Book and
The New Bottoming Book
by Dossie Easton and Janet W. Hardy
Difficulty
Boy Scout Dropout
Click here for definitions of difficulty levels.
Finished Measurements
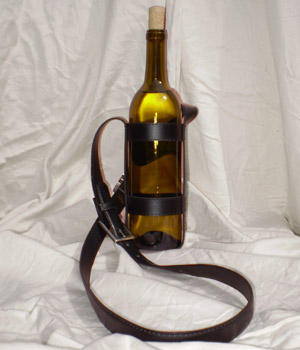
Depends on the bottle and the belts; about 30"/76cm long
Materials
- Straight sided wine bottle with cap or cork
- 3 black leather or synthetic leather men's belts
- Scissors
- Stitching awl
- Spool of heavy duty thread for the stitching awl, black
- Tapestry needle
- 2 rubber bands
Design Notes
This project is supposed to be easy and cheap. Shop thrift stores for the belts, and, for gods' sakes, don't pay more than $2.00 each! It seems that not all thrift stores know the meaning of the word "thrift," so shop around a little if your first stop is asking for too much money.
Try to find belts that match, or are styles that look good together, with regards to both the belt design and the buckles. Two of the belts need to fit each others' buckles with no alteration. Also, check the belts for any cracks or tears. You don't want them to be falling apart before you start the project. Avoid chintzy vinyl belts. They don't hold up well.
Instructions for sewing a lockstitch with a stitching awl can be found here.
If you don't have a stitching awl, you can sew this project with two large hand sewing needles instead, perhaps with a regular awl to help poke the holes. Your fingers will hate you, but it can be done. Instead of a lockstitch, sew a double running stitch, passing the needles through the same holes from opposite sides.
The AntiCraft assumes any well stocked sewing room to have certain things on hand. (Click for our basic sewing items list.)
Decide which belts will go where in the construction of the bottle carrier. Belt A will go under the bottle and up the sides, belt B will be cut to go around the bottle in two places, and Belt C will be the long carry strap. Belts A and C need to fit each others' buckles.
Make the Horizontal Rings:
Cut the buckle off of belt B. Discard it, or put it in your crafting junk drawer—it might come in handy next time you need a way to restrain someone.
From the belt, cut a piece that wraps around the bottle once. Trim the ends of the piece until they just meet, making a close-fitting ring around the bottle. Take the piece off the bottle, butt the ends again, and sew them firmly together, zig zagging across the seam. At the end of the seam, pull both ends of the thread to the outside of the ring and tie them together in square knot. With the tapestry needle, thread the ends under the stitching, and cut the threads off close. Cut another piece from belt B, and sew a second ring in the same manner.
Check that both rings fit the bottle well. They should be just snug enough to stay in place on the bottle. If they're too loose, the solution should be obvious. (It is obvious, isn't it, pet?) If they're too tight, don't despair. Cut a sliver from the remainder of the belt. Remove the stitching from the seam, insert the sliver into the seam, and re-sew the seam around the sliver of belt. Don't worry about the seam being weak; it's about to get reinforced.
Toss the left-over end of the belt wherever you put the buckle you cut off of it. It could come in handy, too, say, as the business end of a slapper. The holes make it extra stingy. Ouch!
Assemble the Carrier
Position the rings on the bottle, one about 2.5"/6.4 cm from the shoulder of the bottle, and the other about the same distance from the bottom.
Buckle belts A and C to each other, both on the last hole. Hold belt C so that belt A hangs from it, with the buckles about even with each other. Slip belt A under the bottle so that it comes up opposite sides, over the rings. With one hand, hold belt A in place on the bottle, while you wrap rubber bands around it at each of the rings. Once the rubber bands are holding everything in place, gently fold belt A back until you can see the top edge of the top ring underneath it on both sides of the bottle. Mark with a pen on the inside of belt A where the top edge of the top ring rests, again on both sides of the bottle. Remove the top rubber band, fold belt A back to the bottom ring, and mark its placement, as well.
Remove the belts and rings from the bottle. Unbuckle belt C from belt A, and set it aside. Position the seam of the bottom ring inside belt A at its positioning mark. Sew the ring to belt A, stitching a square around the seam in the ring. If the belts have decorative stitching along the edges, try to stitch along these lines. While you're doing this awkward task, try not to smack yourself in the face with the flailing ends of the belt. That's my prerogative, slave!
When the square seam is done, pull both threads to the inside of the ring and tie off. With the tapestry needle, run the thread ends between the ring and the belt, and trim the threads close.
Gently squeeze the ring to find the point opposite the seam, position this inside belt A, and sew the pieces together as on the seam side of the ring.
Repeat to sew the upper ring in place.
Slip the bottle into the harness. Buckle belt C to belt A.
Train your servant in the proper use of Restraint.
About
 contact Carin:
• legal info
contact Carin:
• legal info
![]()
home • antifesto • this issue • archive • submit • errata • masthead • contact us • legal